Rich & Creamy Homemade Cookies ‘N Cream Ice Cream
There’s nothing quite like the indulgence of homemade ice cream, especially when it comes to the beloved flavor of cookies ‘n cream. This rich & creamy homemade cookies ‘n cream ice cream is a delightful treat that combines creamy vanilla ice cream with chunks of crunchy chocolate cookies, creating a perfect balance of textures and flavors. The smooth, velvety base complements the satisfying crunch of the cookies, making each bite an unforgettable experience. Whether you’re enjoying it on a hot summer day or serving it at a special occasion, this recipe is sure to please everyone. Did you know that cookies ‘n cream ice cream became popular in the 1980s, largely thanks to its rise in ice cream parlors across the United States? It has since become a staple flavor in many households, resonating with both children and adults alike due to its delightful contrast of textures. With this easy-to-follow recipe, you can recreate this classic flavor in your own kitchen, using simple ingredients and techniques that anyone can master. Imagine the joy of serving this homemade delight, knowing you crafted it from scratch, bringing a smile to everyone’s faces. The nostalgia associated with this flavor can evoke fond memories of childhood ice cream outings, making each scoop not just a treat but a delightful experience steeped in tradition.
Ingredients
- For the Ice Cream Base:
- 2 cups heavy cream
- 1 cup whole milk
- 3/4 cup granulated sugar
- 1 tablespoon pure vanilla extract
- 1/2 cup sweetened condensed milk
- 1/4 teaspoon salt
- For the Cookies:
- 1 1/2 cups chocolate sandwich cookies (like Oreos), crushed
Note: For the best flavor, use high-quality heavy cream and whole milk. These ingredients contribute to the creaminess and rich texture that make this homemade ice cream irresistible. High-fat dairy products like heavy cream are essential as they provide that luscious mouthfeel we associate with premium ice creams. You can also substitute the chocolate sandwich cookies with any other chocolate cookie you prefer, such as chocolate wafer cookies or even homemade chocolate cookies for a personalized touch. Feel free to experiment with different cookie flavors, like mint or peanut butter, for a unique twist. Additionally, if you are looking for a dairy-free version, consider using coconut cream and almond milk to achieve a similar texture and flavor. This adaptation not only caters to dietary restrictions but also introduces a subtle coconut flavor that can be quite delightful. You can even add a scoop of cocoa powder to enhance the chocolate flavor further. Always keep your ingredients as fresh as possible to ensure the highest quality of your rich & creamy homemade cookies ‘n cream ice cream. You can learn more about this topic.
Steps / Instructions
- Prepare the Ice Cream Base: In a large mixing bowl, combine the heavy cream, whole milk, sugar, vanilla extract, sweetened condensed milk, and salt. Whisk the mixture until the sugar is fully dissolved and the ingredients are well blended. This step is crucial, as it ensures a smooth and homogeneous ice cream base. Consider using an electric mixer for a quicker blend, which can help incorporate air into the mixture for an even creamier texture. Aim for a consistency that resembles thick cream, making sure there are no sugar granules remaining.
- Chill the Mixture: Cover the mixing bowl with plastic wrap and refrigerate the ice cream base for at least 2 hours, or overnight if you have time. Chilling helps enhance the flavor and ensures a smoother texture. The longer you chill, the better the flavors meld together, resulting in a more decadent ice cream. If you’re short on time, even a 30-minute chill can make a difference, but longer is always preferable. This step is vital, as it allows the flavors to develop fully, creating a richer overall taste.
- Churn the Ice Cream: Once the mixture is chilled, pour it into your ice cream maker, following the manufacturer’s instructions. Churn the ice cream for about 20-25 minutes, or until it thickens and reaches a soft-serve consistency. Keep an eye on it; the mixture should double in volume and have a fluffy appearance. This is the point where the air is whipped into the mixture, creating that light and airy texture synonymous with ice cream. A well-churned ice cream will feel light yet creamy as you scoop it.
- Add the Cookies: During the last 5 minutes of churning, gradually add the crushed chocolate sandwich cookies to the ice cream. This will ensure even distribution of the cookie bits throughout the ice cream. To enhance the texture, consider pulsing the cookies in a food processor for a finer crumble before adding. The smaller pieces will distribute nicely, creating a delightful crunch in every bite. This technique not only enhances the flavor but also makes each scoop visually appealing, as you’ll see flecks of cookie throughout the ice cream.
- Transfer to a Container: Once the ice cream has reached the desired consistency, transfer it to an airtight container. Smooth the top with a spatula and press a piece of parchment paper on the surface to prevent ice crystals from forming. This is an essential step that helps maintain the quality of your ice cream during storage. Additionally, ensure that the container is completely sealed to minimize air exposure, which can lead to freezer burn. Labeling your container with the date is a great way to keep track of freshness.
- Freeze Until Firm: Place the container in the freezer and let the ice cream freeze for at least 4 hours, or until it is firm enough to scoop. For optimal texture, avoid opening the freezer frequently during this time, as it can cause temperature fluctuations. If you prefer a softer texture, let it sit at room temperature for about 5-10 minutes before serving to make scooping easier. If you notice the ice cream is too hard, a quick mix with a spoon can help soften it slightly before serving.
Tips & Tricks
To achieve the best results with your rich & creamy homemade cookies ‘n cream ice cream, consider the following tips: Check out our related guide for more tips.
- Storage: Store your homemade ice cream in an airtight container in the freezer. It can last for up to 2 weeks, although it’s best enjoyed fresh. For longer storage, consider placing a layer of plastic wrap directly on the surface before sealing. This extra layer can significantly extend the shelf life of your ice cream by protecting it from air exposure. If you notice any ice crystals forming on the surface, simply scrape them off before serving to maintain the texture.
- Make-Ahead: This ice cream base can be prepared a day in advance and left to chill overnight for optimal flavor. If making for a special occasion, this is a great way to save time on the day of serving. Having the base ready allows you to spend more time enjoying the event rather than preparing desserts last minute. Additionally, this gives you the flexibility to churn the ice cream on the day you plan to serve it, ensuring maximum freshness.
- Avoid Ice Crystals: To prevent ice crystals from forming in your ice cream, always store it in an airtight container and cover the surface with parchment paper or plastic wrap. This will keep the texture creamy and smooth. It’s also advisable to keep your freezer at an even temperature to avoid fluctuations that may lead to ice crystals. Consider placing the ice cream in the back of the freezer, where temperatures are most stable.
- Common Mistakes: Ensure that the ice cream base is thoroughly chilled before churning, as this will help achieve the right texture. Not chilling enough can lead to a gritty, icy texture that detracts from the overall enjoyment. Also, be cautious not to over-churn, which can cause the ice cream to become too hard. If you find yourself in a situation where the base didn’t chill long enough, a longer churn time may compensate somewhat, but it’s always best to start with a well-chilled base.
- Pro Techniques: If you don’t have an ice cream maker, you can use a no-churn method. Simply pour the mixed ingredients into a container and freeze, stirring every hour for the first 4–5 hours to help it aerate and avoid ice crystals. This method is surprisingly effective and still yields delicious results. Additionally, using a whisk during the stirring process can help incorporate more air, enhancing the final texture. For an even creamier result, consider adding a tablespoon of vodka to the mixture, which can lower the freezing point and prevent ice crystals, yielding a smoother consistency.
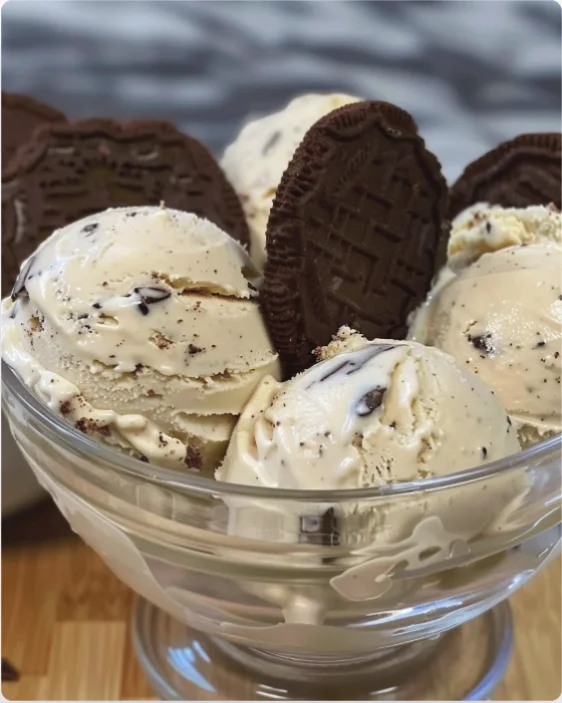
This rich & creamy homemade cookies 'n cream ice cream is a delightful treat that combines creamy vanilla ice cream with chunks of crunchy chocolate cookies, creating a perfect balance of textures and flavors.
Ingredients
- 2 cups heavy cream
- 1 cup whole milk
- 3/4 cup granulated sugar
- 1 tablespoon pure vanilla extract
- 1/2 cup sweetened condensed milk
- 1/4 teaspoon salt
- 1 1/2 cups chocolate sandwich cookies (like Oreos), crushed
Instructions
In a large mixing bowl, combine the heavy cream, whole milk, sugar, vanilla extract, sweetened condensed milk, and salt. Whisk until smooth.
Cover the mixing bowl and refrigerate the ice cream base for at least 2 hours, or overnight.
Pour the chilled mixture into the ice cream maker and churn for 20-25 minutes until thickened.
During the last 5 minutes of churning, add the crushed chocolate cookies.
Transfer the ice cream to an airtight container and smooth the top. Cover with parchment paper.
Freeze for at least 4 hours until firm.
Recipe Reviews
- ★★★★★
Excellent recipe!
Leave a Reply
Your email address will not be published. Required fields are marked *


Excellent recipe!