
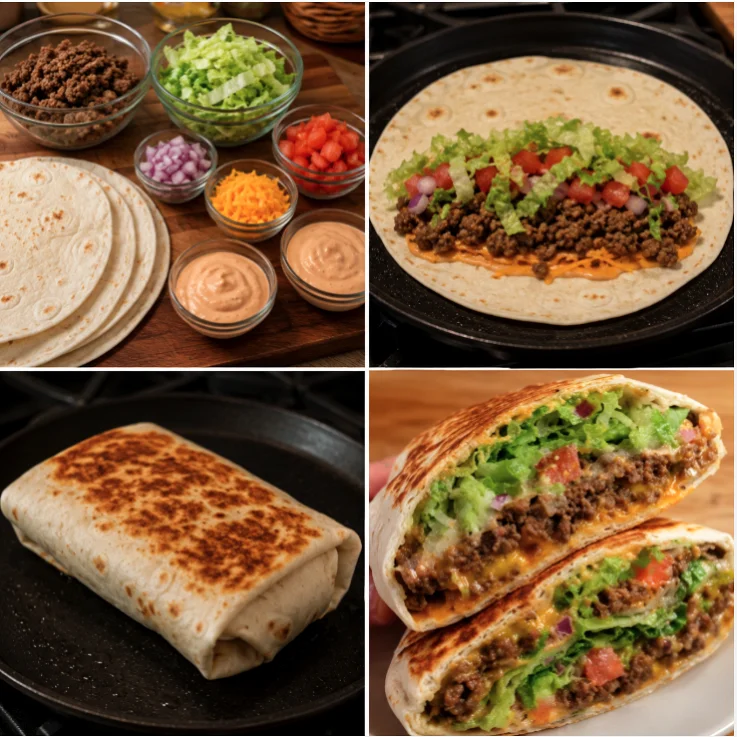
Welcome to the delicious world of crunchy taco wrap melts! This recipe is a crowd-pleaser that combines the vibrant flavors of classic Mexican cuisine with the convenience of a quick meal. Picture this: a crispy tortilla filled with savory ground beef, melted cheese, and your favorite taco toppings, all wrapped up and baked to golden perfection. These wraps are not only easy to prepare but also customizable, making them an ideal choice for family dinners or casual gatherings. Whether you’re a busy parent looking for a fast weeknight dinner solution or just craving a cheesy snack, these taco wraps are sure to satisfy. The combination of textures—from the crunch of the tortilla to the gooeyness of the cheese—creates a symphony of flavors that can cater to any palate. The versatility of this dish allows for endless creativity; you can switch up the fillings based on seasonal ingredients or personal preferences, making each preparation a unique experience. Plus, these wraps are perfect for meal prep, allowing you to make a batch ahead of time for busy weeknights!
Ingredients
- For the filling:
- 1 pound ground beef
- 1 packet taco seasoning (or homemade blend)
- 1 cup shredded cheddar cheese
- 1 cup shredded lettuce
- 1 medium tomato, diced
- 1/2 cup sour cream (optional)
- 1/4 cup sliced jalapeños (optional)
- 1/2 cup black beans (optional, rinsed and drained for added protein)
- For the wraps:
- 4 large flour tortillas
- 1 tablespoon olive oil or cooking spray
- 1/4 teaspoon garlic powder (for extra flavor)
Note: You can substitute ground beef with ground turkey or even a plant-based meat alternative for vegetarian taco wraps. Choose high-quality cheese for the best melting effect! Using freshly shredded cheese rather than pre-packaged can enhance texture and flavor significantly. For an extra zest, consider adding spices like cumin or chili powder to your filling. Additionally, fresh herbs like cilantro or green onions can elevate the flavor profile, providing a burst of freshness. You can learn more about this topic. Remember, the quality of your ingredients can make a significant difference in the overall taste of your crunchy taco wrap melts. Always opt for ripe, juicy tomatoes and crisp lettuce for the best results.
Steps / Instructions
- Preheat your oven: Set your oven to 400°F (200°C) to ensure it’s hot and ready for baking. This temperature is critical for achieving the perfect crunchy texture on your wraps. Preheating helps the wraps to cook evenly and become irresistibly crisp, allowing the cheese to melt perfectly while the tortillas turn golden brown.
- Cook the beef: In a skillet over medium heat, brown the ground beef, breaking it apart with a spatula. Cook until fully browned, approximately 5-7 minutes. Make sure to stir occasionally to prevent sticking and ensure even cooking. Look for a deep brown color to indicate that the beef is well cooked, as this enhances the overall flavor. For added depth, consider adding finely chopped onions or garlic to the beef as it cooks for an aroma that’s hard to resist.
- Add seasoning: Stir in the taco seasoning and follow the package instructions, adding water if required. Let it simmer for about 2-3 minutes until the meat is well coated and flavorful. This step allows the spices to infuse into the beef, enhancing its savory profile. For a richer flavor, consider letting the mixture simmer a bit longer, allowing the spices to meld beautifully and the beef to absorb all those wonderful taco flavors.
- Prepare the tortillas: Lay out the tortillas on a clean surface. Divide the seasoned beef mixture evenly among the tortillas, leaving space around the edges for folding. For easier wrapping, consider warming the tortillas briefly in a microwave or on a skillet to make them more pliable. Warming them reduces the chance of tearing when you fold them, ensuring a better presentation and easier handling.
- Add toppings: Top each beef-filled tortilla with shredded cheese, lettuce, diced tomatoes, jalapeños, and a dollop of sour cream if desired. Don’t be afraid to get creative! Fresh cilantro or sliced avocados can add a refreshing touch, while a squeeze of lime juice can elevate the flavor even more. Remember, layering the ingredients evenly can help with the distribution of flavors in every bite.
- Wrap securely: Fold in the sides of the tortilla and roll from the bottom up to secure all the fillings inside, forming a tight wrap. Make sure there are no gaps to prevent the filling from escaping during baking. A snug wrap helps maintain the integrity of the fillings, ensuring every bite is delicious and packed with flavor.
- Prepare for baking: Lightly brush each wrap with olive oil or spray with cooking spray for extra crispiness. This will help achieve that golden-brown color and crunchy texture that makes these wraps irresistible. Additionally, this step can enhance the flavor of the tortilla itself, making it even more enjoyable. If you like, sprinkle a bit of garlic powder or paprika over the top for an added kick.
- Bake: Place the wraps seam-side down on a baking sheet lined with parchment paper. Bake in the preheated oven for 15-20 minutes, or until golden brown and crispy. Keep an eye on them; they can go from perfect to overdone quickly! You may want to turn them halfway through for an even crunch, ensuring that all sides get the same delicious crispness.
- Serve: Once baked, remove from the oven and let cool for a few minutes before slicing in half. Enjoy your crunchy taco wrap melts warm! They pair wonderfully with a side of salsa, guacamole, or a fresh salad. Consider garnishing with extra cheese or fresh herbs for a pop of color and flavor. For an even more festive touch, serve with lime wedges on the side.
Tips & Tricks
- For a vegetarian version, substitute the ground beef with cooked beans, lentils, or a meat alternative. Add spices to enhance flavor, such as smoked paprika or garlic powder, for added depth. This allows you to maintain the flavor profile while catering to different dietary preferences, making it a versatile option for all eaters.
- Make ahead by preparing the filling in advance and storing it in the fridge. Just assemble and bake when ready to eat. This can save time during busy weeknights, allowing for a quick dinner that doesn’t skimp on taste. You could also freeze the assembled wraps for up to three months—just make sure to wrap them tightly in plastic wrap!
- To ensure that your wraps stay crispy, avoid overloading them with ingredients. Less is often more! A balanced filling ensures that everything holds together nicely and allows the flavors to shine without overwhelming the tortilla. This technique helps maintain the desired crunchy texture that is so appealing.
- Common mistakes include using too much liquid in the filling, leading to soggy wraps. Make sure to drain excess moisture from any vegetables added, and consider patting them dry with a paper towel. This simple step can drastically improve the texture of your final product, allowing the wraps to retain their crunch.
- Experiment with different cheeses like Monterey Jack or pepper jack for added flavor and a spicy kick. Additionally, adding a sprinkle of cheese on top before baking can create a beautiful golden crust that adds to both aesthetics and taste. The melted cheese will create an appealing, bubbly layer that enhances the overall experience.
Crunchy Taco Wrap Melts
A crowd-pleaser that combines the vibrant flavors of classic Mexican cuisine with the convenience of a quick meal. Crispy tortillas filled with savory ground beef, melted cheese, and your favorite taco toppings, all wrapped up and baked to golden perfection.
Ingredients
- 1 pound ground beef
- 1 packet taco seasoning (or homemade blend)
- 1 cup shredded cheddar cheese
- 1 cup shredded lettuce
- 1 medium tomato, diced
- 1/2 cup sour cream (optional)
- 1/4 cup sliced jalapeños (optional)
- 1/2 cup black beans (optional, rinsed and drained for added protein)
- 4 large flour tortillas
- 1 tablespoon olive oil or cooking spray
- 1/4 teaspoon garlic powder (for extra flavor)
Directions
Preheat your oven to 400°F (200°C).
In a skillet over medium heat, brown the ground beef, breaking it apart with a spatula for about 5-7 minutes.
Stir in the taco seasoning and follow the package instructions. Let it simmer for about 2-3 minutes.
Lay out the tortillas on a clean surface and divide the seasoned beef mixture evenly.
Top each tortilla with shredded cheese, lettuce, diced tomatoes, jalapeños, and a dollop of sour cream if desired.
Fold in the sides of the tortilla and roll from the bottom up to secure the fillings inside.
Lightly brush each wrap with olive oil or spray with cooking spray.
Place the wraps seam-side down on a baking sheet lined with parchment paper and bake for 15-20 minutes or until golden brown.
Once baked, let cool for a few minutes before slicing in half and serve warm.
Recipe Reviews
- ★★★★★
Excellent recipe!
Leave a Reply
Your email address will not be published. Required fields are marked *


Excellent recipe!