
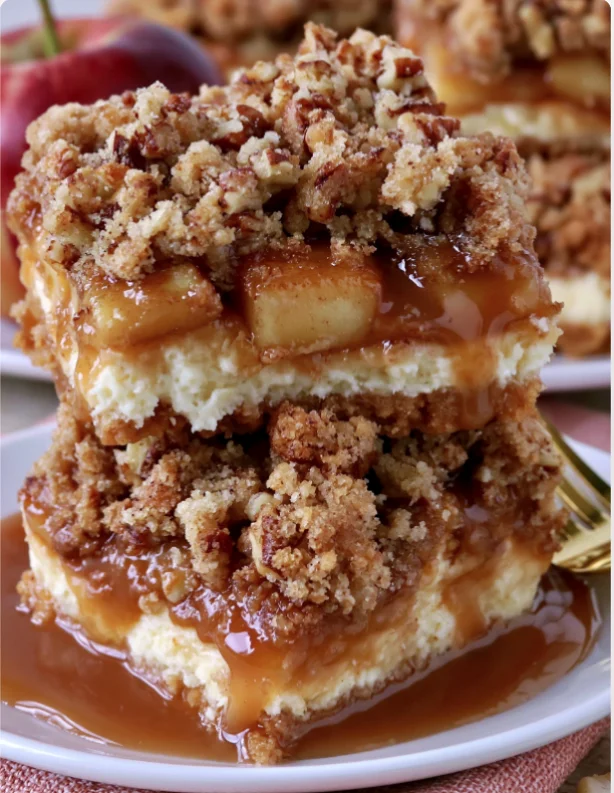
Apple Pie Cheesecake Bars are a delightful fusion of two beloved desserts that evoke the warm, comforting flavors of autumn. This fusion creates a unique dessert experience that celebrates both the creamy richness of cheesecake and the spiced goodness of apple pie. These bars are perfect for any occasion, especially as a fall dessert idea or a sweet treat for potlucks. With a buttery graham cracker crust and a smooth filling swirled with spiced apples, they capture the essence of apple pie flavors in a convenient, shareable format. This recipe is not just easy to make; it also showcases the versatility of cheesecake recipes with fruit, making it a hit among both cheesecake lovers and apple dessert enthusiasts alike. The texture is creamy, and each bite is filled with the perfect blend of sweet and tart, making these bars irresistible. Whether served at a family gathering, a holiday celebration, or as a cozy weeknight dessert, Apple Pie Cheesecake Bars bring a taste of warmth and nostalgia to any table. They are not just a dessert; they’re a heartfelt dish that can spark sweet memories and create new ones with loved ones. Enjoying these bars will have you reminiscing about family gatherings, crisp autumn days, and the irresistible aroma of baked apples and cinnamon wafting through your home. This recipe encapsulates the magic of both apple pie and cheesecake in a way that is sure to delight friends and family alike, making it a cherished addition to your dessert repertoire.
Ingredients
- For the crust:
- 1 ½ cups graham cracker crumbs
- ⅓ cup granulated sugar
- ½ cup unsalted butter, melted
- For the cheesecake filling:
- 24 ounces cream cheese, softened
- 1 cup granulated sugar
- 3 large eggs
- 1 teaspoon vanilla extract
- 1 teaspoon ground cinnamon
- ½ teaspoon ground nutmeg
- ½ cup sour cream
- For the apple topping:
- 2 cups apples, peeled and diced (about 3 medium apples)
- ½ cup granulated sugar
- 1 teaspoon ground cinnamon
- 1 tablespoon lemon juice
- 1 tablespoon cornstarch
Steps / Instructions
- Preheat the oven: Preheat your oven to 325°F (160°C). This ensures that the cheesecake bakes evenly and thoroughly. A properly preheated oven is crucial for achieving that perfect texture in your Apple Pie Cheesecake Bars, preventing both undercooking and overbaking, which can lead to undesirable textures. Additionally, allowing your oven to fully reach the desired temperature before baking will give you a more consistent cooking time.
- Prepare the crust: In a medium bowl, combine the graham cracker crumbs, sugar, and melted butter. Mix until the crumbs are evenly coated, resembling damp sand. Press the mixture firmly into the bottom of a 9×13-inch baking dish to form an even layer, ensuring there are no gaps. This step is vital for a sturdy base that can hold the cheesecake filling without crumbling. Bake for 10 minutes, or until lightly golden, then remove from the oven and let it cool completely before adding the filling. Cooling is essential to maintain the structural integrity of the layers and to prevent the cheesecake filling from becoming too runny.
- Make the apple topping: In a large bowl, toss the diced apples with sugar, cinnamon, lemon juice, and cornstarch. The lemon juice not only adds flavor but also helps prevent the apples from browning, maintaining their fresh appearance. Set aside to let the flavors mingle while you prepare the cheesecake filling, allowing the apples to soften slightly in the mixture. This step enhances the overall flavor, as the apples absorb the spices, creating a delicious topping that complements the creamy filling. The cornstarch will also help thicken the apple mixture, ensuring it doesn’t make the cheesecake soggy.
- Prepare the cheesecake filling: In a large mixing bowl, beat the softened cream cheese and sugar together using a hand mixer or stand mixer until smooth and creamy, about 2-3 minutes. Make sure to scrape down the sides of the bowl to ensure even mixing. This step is important to prevent lumps in your filling. Add the eggs one at a time, mixing well after each addition to incorporate air and achieve a light texture. This is crucial for a fluffy cheesecake. Then, add the vanilla extract, cinnamon, nutmeg, and sour cream. Mix until the filling is completely smooth and well combined, with no lumps remaining. The incorporation of these spices not only enhances flavor but also contributes to the overall warmth and aroma of the bars, which will make your kitchen smell delightful while baking.
- Assemble the bars: Pour the cheesecake filling over the cooled graham cracker crust, spreading it evenly with a spatula. Spoon the apple mixture over the cheesecake filling, distributing it evenly. You can use a knife or a toothpick to swirl the apple topping slightly into the cheesecake filling for a marbled effect, which adds visual appeal and ensures that each bite contains both cheesecake and apple goodness. This marbling technique not only enhances the aesthetics but also ensures a balanced taste of both apple and cheesecake in every serving.
- Bake the cheesecake bars: Bake in the preheated oven for 45-50 minutes, or until the edges are set and the center has a slight jiggle, indicating it’s still creamy. The cheesecake will continue to set as it cools, so avoid overbaking to keep it luscious. Pay attention to the edges—they should pull away slightly from the sides of the pan, which is a sign that it’s ready. If you’re unsure, a toothpick inserted in the center should come out mostly clean, with just a few moist crumbs.
- Cool and chill: Allow the bars to cool at room temperature for about an hour. This gradual cooling is important to prevent cracking. Once cooled, refrigerate for at least 4 hours, preferably overnight, to allow the flavors to develop fully and the texture to firm up. Chilling helps the bars slice neatly, creating clean edges that make for an appealing presentation when served. Patience is key, as the chilling process enhances the flavor and texture, allowing the bars to reach their full potential.
- Cut and serve: Once chilled, use a sharp knife to cut the cheesecake into squares. Wipe the knife clean between cuts for cleaner edges. Serve chilled or at room temperature for the best flavor and texture; they are delightful either way. Consider adding a dollop of whipped cream or a drizzle of caramel sauce for an extra touch of indulgence. The contrast of the creamy filling, spiced apples, and a sweet topping creates a delightful taste experience that guests will love.
Tips & Tricks
To achieve the best results with your Apple Pie Cheesecake Bars, consider the following tips: You can learn more about this topic. Implementing these techniques will help ensure that your dessert turns out perfectly every time.
- Ingredient quality: Use high-quality cream cheese and fresh apples for the best flavor. Granny Smith or Honeycrisp apples work well for their balance of tartness and sweetness. The freshness of the apples will greatly enhance the flavor profile and texture of your bars, making each bite memorable. Look for apples that are firm and crisp to maintain their shape during baking.
- Make-ahead option: These bars can be made a day in advance. In fact, they taste even better after sitting in the refrigerator overnight, allowing the flavors to meld beautifully. This makes them an excellent option for gatherings where you can prepare them ahead of time without compromising on taste. Just remember to cover them well to avoid any fridge odors.
- Storage: Store any leftovers in an airtight container in the refrigerator for up to 5 days. You can also freeze them for up to 3 months; just wrap them tightly in plastic wrap and foil before freezing. To enjoy, simply thaw in the refrigerator overnight, ensuring they retain their creamy consistency. This convenience allows you to savor delicious Apple Pie Cheesecake Bars even on busy days.
- Common mistakes: Avoid overmixing the cheesecake filling, as this can incorporate too much air, leading to cracks. Bake until set but still slightly jiggly in the center to ensure a creamy texture. If cracks do form, you can cover them with a drizzle of caramel sauce or whipped cream for a delicious fix, turning a potential flaw into an appealing feature. Ensuring your ingredients are at room temperature before mixing can also help create a smoother batter.
Apple Pie Cheesecake Bars
Apple Pie Cheesecake Bars are a delightful fusion of two beloved desserts that evoke the warm, comforting flavors of autumn. This fusion creates a unique dessert experience that celebrates both the creamy richness of cheesecake and the spiced goodness of apple pie.
Ingredients
- 1 ½ cups graham cracker crumbs
- ⅓ cup granulated sugar
- ½ cup unsalted butter, melted
- 24 ounces cream cheese, softened
- 1 cup granulated sugar
- 3 large eggs
- 1 teaspoon vanilla extract
- 1 teaspoon ground cinnamon
- ½ teaspoon ground nutmeg
- ½ cup sour cream
- 2 cups apples, peeled and diced (about 3 medium apples)
- ½ cup granulated sugar
- 1 teaspoon ground cinnamon
- 1 tablespoon lemon juice
- 1 tablespoon cornstarch
Directions
Preheat the oven: Preheat your oven to 325°F (160°C).
Prepare the crust: In a medium bowl, combine the graham cracker crumbs, sugar, and melted butter. Press the mixture into the bottom of a 9x13-inch baking dish. Bake for 10 minutes, then let it cool completely.
Make the apple topping: In a large bowl, toss the diced apples with sugar, cinnamon, lemon juice, and cornstarch. Set aside.
Prepare the cheesecake filling: In a large mixing bowl, beat the softened cream cheese and sugar until smooth. Add the eggs one at a time, mixing well. Then, add vanilla, cinnamon, nutmeg, and sour cream. Mix until smooth.
Assemble the bars: Pour the cheesecake filling over the cooled crust. Spoon the apple mixture over the filling and swirl slightly for a marbled effect.
Bake the cheesecake bars: Bake for 45-50 minutes, or until the edges are set and the center has a slight jiggle.
Cool and chill: Allow the bars to cool at room temperature for about an hour, then refrigerate for at least 4 hours, preferably overnight.
Cut and serve: Once chilled, cut the cheesecake into squares. Serve chilled or at room temperature.
Recipe Reviews
- ★★★★★
Excellent recipe!
Leave a Reply
Your email address will not be published. Required fields are marked *


Excellent recipe!