
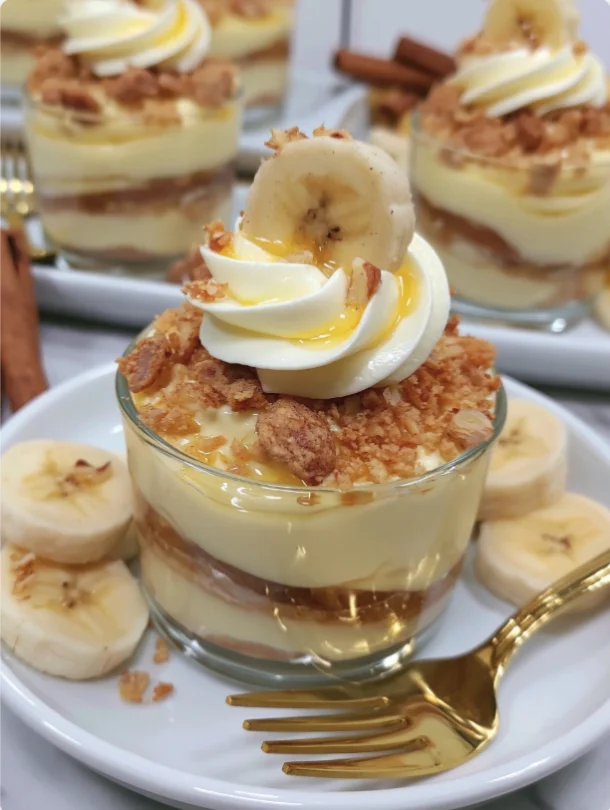
Indulging in a delightful dessert that combines the creamy texture of cheesecake with the nostalgic flavors of banana pudding is a true treat. Banana Pudding Cheesecake Cups offer a refreshing twist on both classic desserts, making them perfect for summer gatherings, picnics, or cozy evenings at home. With their individual servings, these no-bake cheesecake cups are not only delicious but also incredibly easy to prepare, which is a win for any home cook looking for something special. This recipe brings the best of Southern dessert recipes together, creating a sweet summer treat that will leave everyone wanting more. The layers of creamy banana filling, crunchy vanilla wafer crust, and light whipped cream topping come together to create a harmonious blend of flavors and textures that is undeniably satisfying. The simplicity of this dessert allows the natural sweetness of the bananas to shine, while the cream cheese adds a luxurious richness that elevates the entire experience. Not to mention, it’s a wonderful way to use up ripe bananas before they go bad, minimizing food waste while creating something delightful! Whether you’re hosting a gathering or simply satisfying a sweet tooth, these cups are sure to impress.
Ingredients
To create these delightful Banana Pudding Cheesecake Cups, gather the following ingredients: You can learn more about this topic. Each ingredient plays a crucial role in achieving the perfect balance of flavors and textures, so it’s important to measure accurately. Using fresh and high-quality ingredients will significantly enhance the final taste of your dessert. For instance, opting for organic bananas can enhance the sweetness and flavor profile of the filling, making your cheesecake cups even more irresistible.
For the Vanilla Wafer Crust:
- 1 ½ cups vanilla wafer crumbs – look for the best quality wafers for a more flavorful crust. You can also crush them yourself to achieve a finer texture. If you prefer, graham cracker crumbs can be used as an alternative for a different flavor.
- ½ cup unsalted butter, melted – using unsalted butter allows you to control the saltiness of the crust; it also contributes to a rich flavor when mixed with the crumbs. Ensure the butter is melted but not too hot, as this can affect the texture of the crust.
- 2 tablespoons granulated sugar – this adds a touch of sweetness to the crust, enhancing the overall flavor and ensuring a delicious base for the cheesecake filling. Adjust the sugar if you prefer a less sweet crust to balance with the filling.
For the Creamy Banana Filling:
- 2 ripe bananas, mashed – ensure they are well-ripened for maximum sweetness and flavor; overripe bananas work best as they provide a naturally sweet taste. The riper the bananas, the more pronounced the banana flavor will be in your cheesecake cups.
- 8 ounces cream cheese, softened – bring it to room temperature for easier mixing. This will help create a smoother filling without lumps. If you want a lighter option, you can use low-fat cream cheese; however, the texture may differ slightly.
- 1 cup powdered sugar – this sweetens the filling while contributing to a smooth texture, making it easy to blend with the other ingredients. For a less sugary taste, you can reduce this amount or substitute with a sugar alternative.
- 1 cup heavy whipping cream – for that light, airy texture in your filling. Whipping the cream properly is key to achieving that fluffy consistency. Ensure your bowl and beaters are cold for best results.
- 1 teaspoon vanilla extract – use pure vanilla extract for the best flavor; this elevates the taste significantly and adds a warm tone to the dessert. Avoid imitation vanilla, as it lacks the depth of flavor required.
- 1 tablespoon lemon juice – this helps to brighten the flavors and prevent the bananas from oxidizing, maintaining their beautiful color. Fresh lemon juice is recommended for optimal taste.
For the Topping:
- 1 cup whipped cream topping (store-bought or homemade) – homemade is preferred for freshness, and you can whip it to your desired consistency! If using store-bought, look for a brand with minimal additives for the best flavor.
- Additional banana slices for garnish – choose bananas that are evenly ripe to complement the dish visually. A sprinkle of cinnamon on the bananas can enhance flavor; consider using a dash of nutmeg for an extra kick.
- Crushed vanilla wafers for garnish – adds texture and visual appeal to the finished cups, making them even more enticing. You can mix in some chopped nuts for added crunch if desired.
Note: For the best flavor, use ripe bananas and high-quality cream cheese. Feel free to adjust the amount of sugar based on your sweetness preference; some may prefer a less sweet filling. Check out our related guide for more tips on ingredient choices and potential substitutions that can enhance your dessert experience. Remember, the quality of your ingredients will directly impact the final result, so choose wisely! Additionally, using fresh whipped cream will give your dessert a more luxurious texture compared to packaged options.
Steps / Instructions
- Prepare the Crust: In a medium bowl, combine the vanilla wafer crumbs, melted butter, and granulated sugar. Stir until the mixture resembles wet sand, ensuring there are no dry bits of crumb remaining for a cohesive crust. This mixture should hold together when squeezed; if it crumbles, add a little more melted butter. Aim for a mixture that sticks together well and is not overly greasy.
- Assemble the Cups: Spoon about 2 tablespoons of the crumb mixture into the bottom of each dessert cup. Press the crumbs down firmly to create an even layer; this will help the crust hold together when you add the filling. Use the back of a spoon or your fingers to ensure it’s tightly packed, creating a solid foundation for the delicious creamy filling.
- Make the Filling: In a large mixing bowl, beat the softened cream cheese with an electric mixer until smooth and creamy, which should take about 2 minutes. Gradually add the powdered sugar, mixing until fully combined and fluffy; this ensures an even sweetness throughout the filling. Scrape down the sides of the bowl as needed to incorporate all the ingredients, ensuring the filling is uniformly mixed for the best flavor.
- Add Bananas: Fold the mashed bananas into the cream cheese mixture gently, ensuring they are evenly incorporated without over-mixing, which can make the filling grainy. The bananas should be evenly dispersed to provide flavor in every bite, adding a delightful banana flavor that complements the cream cheese.
- Whip the Cream: In a separate bowl, whip the heavy cream until stiff peaks form, which usually takes about 3-4 minutes. Gently fold the whipped cream into the banana mixture until combined, being careful not to deflate the whipped cream; this keeps the filling light and airy, which is key for a successful cheesecake cup. The whipped cream provides that cloud-like texture that makes these cups so irresistible.
- Layer the Filling: Spoon the creamy banana filling over the crust in each cup, filling them about three-quarters full. Use a spatula to smooth the tops for an attractive presentation. This step ensures that each cup looks as good as it tastes, enticing your guests with its lovely layers!
- Chill: Refrigerate the cups for at least 2 hours, allowing the flavors to meld and the cheesecake to set. This chilling time is crucial for the right texture; the longer you chill, the firmer the cups will become. A well-chilled cup will also help the flavors develop beautifully, making each bite utterly divine.
- Add Toppings: Once chilled, top each cup with a generous dollop of whipped cream, banana slices, and a sprinkle of crushed vanilla wafers to add a final touch of sweetness and crunch. This not only enhances the flavor but also creates an appealing visual contrast, making your dessert as inviting as it is delicious.
Tips & Tricks
- Storage: Store any leftovers in an airtight container in the refrigerator for up to 3 days. The flavors will continue to develop over time, making them even more delicious on the second day. However, for the best texture, consume within the first couple of days, as the crust may soften over time due to moisture.
- Make Ahead: These cups can be prepared a day in advance, making them a great option for parties or gatherings. Just add the whipped cream topping right before serving to keep it fresh and fluffy. This will save you time and hassle on the day of your event, allowing you to enjoy the festivities without worrying about dessert!
- Avoiding Browning: To prevent the banana slices from browning, toss them in a bit of lemon juice before using them as a topping; this will help maintain their vibrant color and freshness. This not only keeps them looking appealing but also adds a subtle tang that complements the sweetness of the bananas. It’s a small step that can make a big difference in presentation!
- Consistency: If you prefer a thicker filling, you can add an extra 4 ounces of cream cheese to the mixture, which will result in a richer texture. Adjust the sugar accordingly to balance the sweetness, ensuring that the filling remains delicious and satisfying. Alternatively, if you want a lighter filling, consider folding in some Greek yogurt for added creaminess without the extra calories.
Banana Pudding Cheesecake Cups
Indulging in a delightful dessert that combines the creamy texture of cheesecake with the nostalgic flavors of banana pudding is a true treat. Banana Pudding Cheesecake Cups offer a refreshing twist on both classic desserts, making them perfect for summer gatherings, picnics, or cozy evenings at home. With their individual servings, these no-bake cheesecake cups are not only delicious but also incredibly easy to prepare, which is a win for any home cook looking for something special.
Ingredients
- 1 ½ cups vanilla wafer crumbs
- ½ cup unsalted butter, melted
- 2 tablespoons granulated sugar
- 2 ripe bananas, mashed
- 8 ounces cream cheese, softened
- 1 cup powdered sugar
- 1 cup heavy whipping cream
- 1 teaspoon vanilla extract
- 1 tablespoon lemon juice
- 1 cup whipped cream topping
- Additional banana slices for garnish
- Crushed vanilla wafers for garnish
Directions
Prepare the Crust: In a medium bowl, combine the vanilla wafer crumbs, melted butter, and granulated sugar. Stir until the mixture resembles wet sand, ensuring there are no dry bits of crumb remaining for a cohesive crust. This mixture should hold together when squeezed.
Assemble the Cups: Spoon about 2 tablespoons of the crumb mixture into the bottom of each dessert cup. Press the crumbs down firmly to create an even layer.
Make the Filling: In a large mixing bowl, beat the softened cream cheese with an electric mixer until smooth and creamy, about 2 minutes. Gradually add the powdered sugar, mixing until fully combined and fluffy.
Add Bananas: Fold the mashed bananas into the cream cheese mixture gently, ensuring they are evenly incorporated without over-mixing.
Whip the Cream: In a separate bowl, whip the heavy cream until stiff peaks form, about 3-4 minutes. Gently fold the whipped cream into the banana mixture until combined.
Layer the Filling: Spoon the creamy banana filling over the crust in each cup, filling them about three-quarters full.
Chill: Refrigerate the cups for at least 2 hours, allowing the flavors to meld and the cheesecake to set.
Nutrition Facts
Recipe Reviews
- ★★★★★
Excellent recipe!
Leave a Reply
Your email address will not be published. Required fields are marked *

Excellent recipe!