
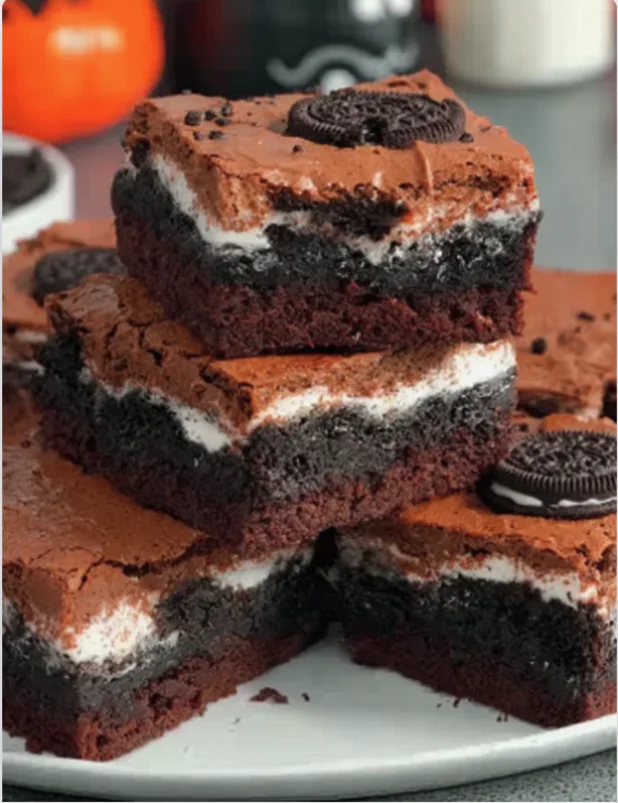
As the leaves change color and the air turns crisp, Halloween brings out the creative spirit in bakers everywhere. One of the standout recipes that captures the whimsical and spooky essence of this season is the Oreo Layered Halloween Brownies. These brownies combine the rich, fudgy texture of chocolate brownies with the playful crunch and creaminess of Oreo cookies, making them a delightful treat for both kids and adults. What sets this recipe apart is the vibrant layers that not only taste amazing but also fit the Halloween theme perfectly. The contrast of the dark chocolate brownie with the bright white Oreo layer creates an inviting visual that is hard to resist, making them an instant favorite.
Imagine a decadent layer of moist chocolate brownie, topped with a creamy Oreo filling, and finished off with a layer of chocolate ganache. The combination of flavors—chocolate and vanilla—creates a delightful balance that is both rich and satisfying. Moreover, the visual appeal of these brownies, with their contrasting layers, makes them an eye-catching centerpiece for any Halloween gathering or party. The process of layering also adds an element of fun to baking, allowing you to engage with family or friends as you create this masterpiece together. This recipe offers not only a delicious dessert but also a fun baking experience that you can enjoy with loved ones. You can learn more about this topic, exploring its origins and variations that have emerged over the years. The tradition of creating festive treats during Halloween has been passed down through generations, and these brownies are a perfect blend of nostalgia and modern baking flair.
Ingredients
- For the Brownie Layer:
- 1 cup unsalted butter (2 sticks) – Make sure the butter is softened to room temperature for easy mixing. Cold butter can result in a lumpy batter.
- 2 cups granulated sugar – This will give the brownies their sweetness, balancing the rich chocolate flavor and creating a chewy texture when baked.
- 4 large eggs – Fresh eggs help provide structure and moisture. Make sure they are at room temperature for better incorporation into the batter.
- 1 teaspoon vanilla extract – A high-quality extract enhances the overall flavor of the brownies, creating a warm, inviting aroma.
- 1 cup all-purpose flour – Provides the necessary structure for the brownies, contributing to their dense and fudgy characteristics.
- 1 cup unsweetened cocoa powder – Use good-quality cocoa for a richer chocolate flavor, ensuring a deep color and robust taste in the finished brownies.
- 1/2 teaspoon baking powder – This helps the brownies rise slightly, giving them a nice texture without making them cake-like.
- 1/4 teaspoon salt – Enhances the sweetness and flavor of the chocolate, balancing the overall dish.
- For the Oreo Layer:
- 1 package (8 oz) cream cheese, softened – Ensure it’s at room temperature for smooth mixing. This will help achieve the creamy texture that is characteristic of the Oreo layer.
- 1/3 cup powdered sugar – Adds sweetness and helps achieve a smooth consistency, making the filling perfectly sweet without being overpowering.
- 1 teaspoon vanilla extract – Use the same quality as in the brownie layer for consistency in flavor, enhancing the dessert as a whole.
- 1 cup crushed Oreo cookies (about 10-12 cookies) – You can use regular or double-stuffed Oreos depending on your preference. The crushed cookies add both flavor and texture.
- 1 cup whipped topping (like Cool Whip) – This adds a lightness to the layer, balancing the dense brownie layer and preventing it from being too rich.
- For the Ganache Topping:
- 1 cup semi-sweet chocolate chips – Opt for high-quality chocolate for a glossy finish. Brands like Ghirardelli or Nestlé Toll House work well here.
- 1/2 cup heavy cream – This is essential for creating a smooth ganache that sets well, providing a luscious layer that complements the brownies perfectly.
- Crushed Oreo cookies for garnish (optional) – Adds extra crunch and visual appeal on top of the ganache, making your presentation even more festive.
Steps / Instructions
- Preheat the Oven: Preheat your oven to 350°F (175°C). Grease a 9×13-inch baking pan or line it with parchment paper for easy removal later. The parchment paper should hang over the sides, making it easier to lift the brownies out once they are baked and cooled. This step ensures even baking and prevents sticking.
- Make the Brownie Batter: In a large saucepan, melt the butter over low heat. Remove from heat and stir in the sugar until well combined. Allow the mixture to cool slightly before adding the eggs, one at a time, mixing well after each addition. Stir in the vanilla. It’s crucial to allow the mixture to cool to prevent the eggs from cooking when added. A warm batter ensures a fudgy, moist brownie consistency.
- Combine Dry Ingredients: In a separate bowl, whisk together the flour, cocoa powder, baking powder, and salt. Gradually add the dry ingredients to the butter mixture, stirring just until combined. Do not overmix to ensure the brownies remain fudgy and moist. A few lumps are okay, as they will bake out.
- Bake the Brownies: Pour the brownie batter into the prepared baking pan and spread evenly. Bake for 25-30 minutes, or until a toothpick inserted into the center comes out clean. Keep in mind that every oven is different; the edges might look set while the center remains slightly soft, which is ideal for a fudgy texture. Allow the brownies to cool completely in the pan. This cooling period is essential for the layers to adhere well and for the flavors to mature.
- Prepare the Oreo Layer: In a mixing bowl, beat the softened cream cheese until smooth. Gradually add the powdered sugar and vanilla extract, mixing until well combined. Fold in the crushed Oreo cookies and whipped topping until the mixture is smooth and creamy. This layer should be thick yet spreadable, so ensure there are no lumps of cream cheese to maintain a silky texture.
- Layer the Oreo Mixture: Once the brownies have cooled completely, spread the Oreo filling evenly over the brownie layer. Use a spatula to smooth it out gently. Place the pan in the refrigerator for about 30 minutes to allow the Oreo layer to set. Chilling will help firm up the filling and make it easier to add the ganache later.
- Make the Ganache: In a small saucepan, heat the heavy cream over medium heat until it just begins to simmer. Remove from heat and add the chocolate chips. Let it sit for a minute, then stir until smooth and glossy. The ganache should be pourable but not too runny; adjust with more chocolate or cream as needed to achieve your desired consistency.
- Top with Ganache: Pour the chocolate ganache over the chilled Oreo layer, spreading it evenly with a spatula. Sprinkle crushed Oreo cookies on top if desired for added texture and decoration. This final layer not only enhances the flavor but also adds to the visual appeal of the Oreo Layered Halloween Brownies, making them even more tempting.
- Chill Again: Place the entire dessert back in the refrigerator for at least 2 hours or until the ganache is set. This step is crucial for achieving clean cuts when slicing the brownies, allowing the layers to hold together beautifully.
- Slice and Serve: Once set, remove the brownies from the pan using the parchment paper. Cut them into squares or rectangles and serve. Enjoy your delightful Oreo Layered Halloween Brownies! They are perfect for sharing at parties, adding a festive touch to any gathering, or simply savoring at home after school or work.
Tips & Tricks
To ensure your Oreo Layered Halloween Brownies turn out perfectly, consider these expert tips: Check out our related guide for more helpful insights and tricks.
- Ingredient Quality: Use high-quality cocoa powder and chocolate chips for the best flavor. Brands like Ghirardelli or Callebaut can elevate your dessert significantly, providing a deeper chocolate experience. The same goes for the Oreos; fresh cookies yield better flavor and texture.
- Cooling Time: Be patient with cooling the brownie base and Oreo layer. Allowing them to chill properly helps the layers set and makes slicing easier. If you’re in a hurry, you can place the pan in the freezer for a short time, but monitor it closely to prevent freezing, which could alter the texture.
- Storage: Store leftover brownies in an airtight container in the refrigerator for up to a week. They also freeze well; just wrap them tightly in plastic wrap and foil before freezing. When ready to eat, let them thaw in the fridge overnight for the best texture and flavor retention.
- Make Ahead: These brownies can be made a day in advance. Prepare them the day before your Halloween gathering for convenience. They often taste even better the next day as the flavors meld beautifully, making them a go-to option for potlucks or holiday festivities.
- Avoid Overbaking: Keep an eye on the brownie layer while baking. Overbaked brownies can become dry, leading to a less enjoyable texture. Remove them as soon as a toothpick comes out with a few moist crumbs, as they will continue to cook slightly after being removed from the oven. This ensures they stay soft and fudgy.
Oreo Layered Halloween Brownies
These brownies combine the rich, fudgy texture of chocolate brownies with the playful crunch and creaminess of Oreo cookies, making them a delightful treat for both kids and adults. The vibrant layers not only taste amazing but also fit the Halloween theme perfectly.
Ingredients
- 1 cup unsalted butter (2 sticks)
- 2 cups granulated sugar
- 4 large eggs
- 1 teaspoon vanilla extract
- 1 cup all-purpose flour
- 1 cup unsweetened cocoa powder
- 1/2 teaspoon baking powder
- 1/4 teaspoon salt
- 1 package (8 oz) cream cheese, softened
- 1/3 cup powdered sugar
- 1 teaspoon vanilla extract
- 1 cup crushed Oreo cookies (about 10-12 cookies)
- 1 cup whipped topping (like Cool Whip)
- 1 cup semi-sweet chocolate chips
- 1/2 cup heavy cream
- Crushed Oreo cookies for garnish (optional)
Directions
Preheat your oven to 350°F (175°C). Grease a 9x13-inch baking pan or line it with parchment paper.
In a large saucepan, melt the butter over low heat. Remove from heat and stir in the sugar until well combined. Allow to cool slightly before adding eggs one at a time, mixing well. Stir in the vanilla.
In a separate bowl, whisk together the flour, cocoa powder, baking powder, and salt. Gradually add the dry ingredients to the butter mixture, stirring just until combined.
Pour the brownie batter into the prepared baking pan and bake for 25-30 minutes or until a toothpick inserted into the center comes out clean. Allow to cool completely in the pan.
In a mixing bowl, beat the softened cream cheese until smooth. Gradually add powdered sugar and vanilla, mixing until well combined. Fold in crushed Oreo cookies and whipped topping until smooth.
Spread the Oreo filling evenly over the cooled brownie layer. Refrigerate for about 30 minutes.
In a small saucepan, heat heavy cream until it simmers. Remove from heat and add chocolate chips. Stir until smooth.
Pour the ganache over the chilled Oreo layer, spreading it evenly. Sprinkle crushed Oreo cookies on top if desired.
Chill again for at least 2 hours or until the ganache is set.
Remove brownies from the pan using the parchment paper and cut into squares.
Nutrition Facts
Recipe Reviews
- ★★★★★
Excellent recipe!
Leave a Reply
Your email address will not be published. Required fields are marked *


Excellent recipe!