If you’re a fan of classic American desserts, you’re in for a treat! Homemade Nutter Butters are a nostalgic favorite, combining the rich, creamy goodness of peanut butter with a delightful cookie crunch. These sandwich cookies are not only easy to make but also provide a perfect balance of sweet and salty flavors that make them irresistible. Whether you’re baking for a special occasion or simply treating yourself, this recipe promises to deliver heavenly bites that will transport you back to cherished childhood memories. The simplicity of the ingredients allows for a straightforward baking experience that anyone can enjoy. Plus, they make for a wonderful gift during the holiday season, capturing the hearts of family and friends alike. With just a few simple steps, you can recreate the magic of this beloved cookie at home!
Ingredients
To create these delightful Homemade Nutter Butters, you will need the following ingredients: You can learn more about this topic. Each ingredient plays a crucial role in achieving the perfect texture and flavor, so it’s essential to measure accurately and choose quality components. Using fresh ingredients will enhance the overall taste of the cookies, making them even more enjoyable.
- For the Cookies:
- 1 cup creamy peanut butter – Opt for a brand that you enjoy eating straight from the jar for the best flavor. Natural peanut butter can also be used for a more wholesome option but may slightly alter the texture.
- 1/2 cup granulated sugar – This adds sweetness and helps in creating a crisp texture. Adjust the amount based on your preference for sweetness.
- 1/2 cup brown sugar, packed – The molasses in brown sugar brings moisture and a deeper flavor to the cookies. Using light or dark brown sugar can also add different flavor profiles.
- 1 large egg – This acts as a binder, ensuring that your cookies hold together beautifully. If you’re looking for an egg-free option, consider using a flax egg or applesauce as a substitute.
- 1 teaspoon vanilla extract – Vanilla adds a warm, aromatic element that complements the peanut butter. Use pure vanilla extract for the best flavor.
- 1 teaspoon baking soda – This leavening agent helps the cookies rise and achieve a pleasant softness. Ensure your baking soda is fresh for optimal results.
- 1/4 teaspoon salt – A pinch of salt enhances the sweetness and balances the flavors perfectly. Don’t skip this, as it plays a vital role in taste.
- 1 1/4 cups all-purpose flour – This is the foundation of your cookie dough, providing structure and stability. For a gluten-free option, you can substitute with a gluten-free flour blend.
- For the Filling:
- 1/2 cup creamy peanut butter – Use the same type as in the cookies for consistency in flavor and texture. This will ensure a harmonious taste in every bite.
- 1 cup powdered sugar – This sweetens and thickens the filling, giving it a delightful creaminess. Sift the sugar before adding to avoid lumps.
- 1 teaspoon vanilla extract – This ties the filling together, ensuring every bite is packed with flavor. Again, opt for pure extract for the richest taste.
- For the Chocolate Dip:
- 1 cup semi-sweet chocolate chips or melting chocolate – Choose high-quality chocolate for the best dipping experience. Dark chocolate can be used for a richer taste.
- 1 tablespoon coconut oil (optional, for a smoother consistency) – Coconut oil can help create a glossy finish and improve the flow of the chocolate. It’s not necessary but adds a nice sheen to your dipped cookies.
Steps / Instructions
- Preheat your oven: Start by preheating your oven to 350°F (175°C). This ensures that your cookies will bake evenly. A well-preheated oven is key to achieving the perfect texture—too cool and your cookies may spread too much. You can also line your baking sheets with parchment paper to make for easier cleanup.
- Mix the cookie dough: In a large mixing bowl, combine 1 cup of creamy peanut butter, 1/2 cup of granulated sugar, and 1/2 cup of brown sugar. Mix until smooth and creamy. This step should take about 2-3 minutes using an electric mixer, but you can also use a whisk if you prefer a workout. Make sure there are no lumps for the smoothest dough.
- Add egg and vanilla: Beat in the egg and 1 teaspoon of vanilla extract until fully incorporated. The mixture should look glossy and well-blended; this is crucial for the right texture. Scrape down the sides of the bowl to ensure every ingredient is well combined.
- Combine dry ingredients: In a separate bowl, whisk together 1 teaspoon of baking soda, 1/4 teaspoon of salt, and 1 1/4 cups of all-purpose flour. Gradually add this mixture to the peanut butter mixture, mixing until combined. Avoid overmixing, as this can lead to tougher cookies. The dough should be soft but firm enough to hold its shape.
- Shape the cookies: Using a tablespoon or cookie scoop, drop rounded tablespoons of dough onto a parchment-lined baking sheet, spacing them about 2 inches apart. This spacing allows them to spread without merging into one another as they bake. For uniform cookies, you may want to roll the dough into balls before placing them on the sheet.
- Flatten the cookies: Using the back of a fork, gently press down on each cookie to create a crisscross pattern. This not only enhances the appearance but helps the cookies to bake evenly. Press down firmly enough to create the pattern but not so hard that the cookies lose their shape; a light touch is usually sufficient.
- Bake: Place the baking sheet in the preheated oven and bake for 10-12 minutes or until the edges are lightly golden. Remove from the oven and allow the cookies to cool on the baking sheet for 5 minutes before transferring them to a wire rack to cool completely. Keep an eye on them; they can go from perfectly baked to overdone quickly! The centers will appear soft but will firm up as they cool.
- Prepare the filling: While the cookies cool, prepare the filling by mixing 1/2 cup of creamy peanut butter, 1 cup of powdered sugar, and 1 teaspoon of vanilla extract in a bowl until smooth and creamy. The filling should be thick but spreadable; adjust the consistency with a little more powdered sugar if necessary. If you find it too thick, a splash of milk can help achieve the desired consistency.
- Assemble the cookies: Spread a generous amount of the peanut butter filling on the bottom of one cookie and top it with another cookie, creating a sandwich. Repeat with the remaining cookies. Be sure to use enough filling to make each sandwich satisfying, but not so much that it spills out. Press down gently to ensure the filling adheres to both cookies.
- Dip in chocolate: In a microwave-safe bowl, melt 1 cup of semi-sweet chocolate chips with 1 tablespoon of coconut oil (if using) in 30-second intervals, stirring between each, until smooth. Dip half of each cookie sandwich into the melted chocolate, allowing excess to drip off. This step adds a decadent touch, turning your cookies into a truly indulgent treat. Make sure the chocolate is not too hot to prevent it from melting the filling.
- Cool the cookies: Place the dipped cookies back on the parchment paper and allow the chocolate to set. You can speed up this process by placing the cookies in the refrigerator for about 15 minutes. The chocolate should harden perfectly, creating a delightful contrast with the soft filling. Enjoy the anticipation as they cool, knowing you’ve created a delightful homemade treat!
Tips & Tricks
Here are some expert tips to ensure your Homemade Nutter Butters turn out perfect: Check out our related guide for more tips. These insights can help you navigate any challenges you may encounter during the baking process, ensuring success with every batch.
- Storage: Store your cookies in an airtight container at room temperature for up to one week. If you want to keep them longer, consider freezing them. Just make sure to separate layers with parchment paper and freeze in an airtight container for up to three months. This will preserve their freshness and taste! When you’re ready to enjoy them again, simply let them thaw at room temperature.
- Make-ahead options: You can prepare the cookie dough a day in advance. Keep it wrapped in plastic wrap in the refrigerator until you’re ready to bake. This can save you time on the day you plan to serve your cookies. Additionally, the dough can be frozen for future baking; just thaw it in the fridge overnight before baking.
- Avoiding common mistakes: Ensure that your peanut butter is creamy, as natural or chunky peanut butter can alter the texture of your cookies. Also, be careful not to overbake; they should be lightly golden at the edges and soft in the center. If the cookies feel too soft when you take them out, they will firm up as they cool. Always do a test cookie if you’re unsure about baking time!
- Pro technique: For the best chocolate coating, ensure your cookies are completely cool and use a fork to dip them, allowing for even coverage and minimal mess. This also helps in achieving a smooth chocolate layer without clumps or drips. You can also sprinkle some chopped nuts or sea salt on top of the chocolate for an added layer of flavor and texture!
Conclusion
Now that you have all the steps to make these delightful Homemade Nutter Butters, it’s time to roll up your sleeves and get baking! These cookies are perfect for sharing with friends, packing in lunch boxes, or enjoying as a comforting snack at home. Their creamy peanut butter filling and chocolaty exterior make them a true indulgence. Don’t forget to share your homemade creations and let us know how they turned out! We can’t wait to hear about your baking adventures and any personal touches you added to your Homemade Nutter Butters!
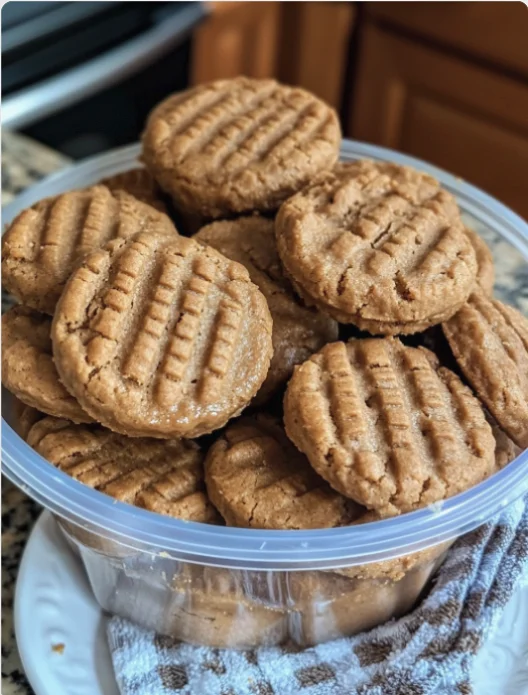
Homemade Nutter Butters are a nostalgic favorite, combining the rich, creamy goodness of peanut butter with a delightful cookie crunch. These sandwich cookies are not only easy to make but also provide a perfect balance of sweet and salty flavors that make them irresistible.
Ingredients
- 1 cup creamy peanut butter
- 1/2 cup granulated sugar
- 1/2 cup brown sugar, packed
- 1 large egg
- 1 teaspoon vanilla extract
- 1 teaspoon baking soda
- 1/4 teaspoon salt
- 1 1/4 cups all-purpose flour
- 1/2 cup creamy peanut butter (for filling)
- 1 cup powdered sugar (for filling)
- 1 teaspoon vanilla extract (for filling)
- 1 cup semi-sweet chocolate chips or melting chocolate (for dipping)
- 1 tablespoon coconut oil (optional, for smoother consistency)
Instructions
Preheat your oven to 350°F (175°C).
In a large mixing bowl, combine 1 cup of creamy peanut butter, 1/2 cup of granulated sugar, and 1/2 cup of brown sugar. Mix until smooth and creamy.
Beat in the egg and 1 teaspoon of vanilla extract until fully incorporated.
In a separate bowl, whisk together 1 teaspoon of baking soda, 1/4 teaspoon of salt, and 1 1/4 cups of all-purpose flour. Gradually add this mixture to the peanut butter mixture, mixing until combined.
Using a tablespoon or cookie scoop, drop rounded tablespoons of dough onto a parchment-lined baking sheet, spacing them about 2 inches apart.
Using the back of a fork, gently press down on each cookie to create a crisscross pattern.
Place the baking sheet in the preheated oven and bake for 10-12 minutes or until the edges are lightly golden.
While the cookies cool, prepare the filling by mixing 1/2 cup of creamy peanut butter, 1 cup of powdered sugar, and 1 teaspoon of vanilla extract in a bowl until smooth and creamy.
Spread a generous amount of the peanut butter filling on the bottom of one cookie and top it with another cookie, creating a sandwich.
In a microwave-safe bowl, melt 1 cup of semi-sweet chocolate chips with 1 tablespoon of coconut oil in 30-second intervals, stirring between each, until smooth.
Dip half of each cookie sandwich into the melted chocolate, allowing excess to drip off.
Place the dipped cookies back on the parchment paper and allow the chocolate to set.
Recipe Reviews
- ★★★★★
Excellent recipe!
Leave a Reply
Your email address will not be published. Required fields are marked *



Excellent recipe!