
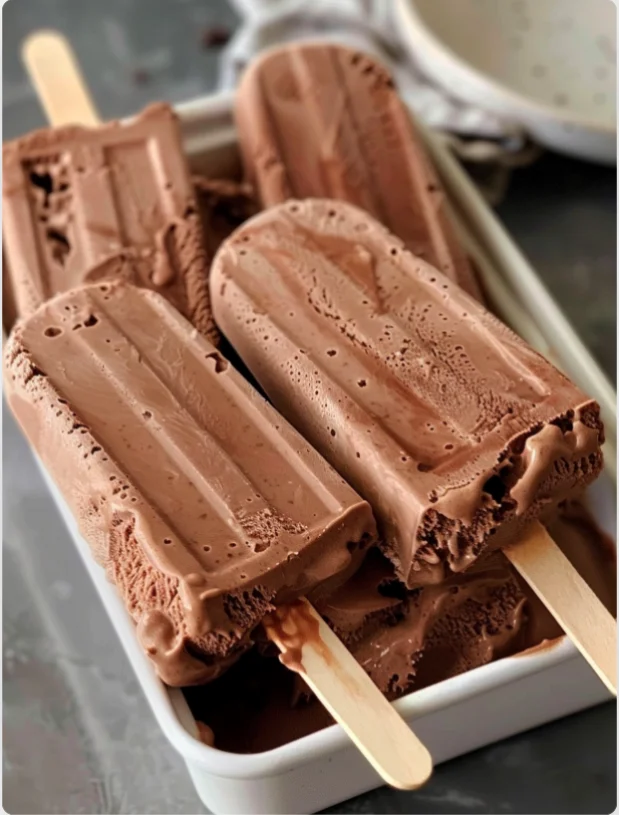
Imagine a hot summer day, where the sun blazes overhead, and a cool indulgence is just what you need to beat the heat. Enter the delightful world of Creamy Chocolate Popsicles! This recipe is not only a kid-friendly treat but also an indulgent dessert for chocolate lovers of all ages. With a rich, creamy texture and a deep chocolate flavor, these popsicles embody the essence of summer fun and relaxation. The best part? They are incredibly easy to make, requiring minimal ingredients and no special equipment. Plus, they can be customized to your taste, making them a versatile option for any gathering or family treat. Did you know that popsicles have been enjoyed since the early 1900s? They have evolved from simple icicles to elaborate frozen delights, and our Creamy Chocolate Popsicles fit perfectly into this delicious tradition. Adding to their charm, these popsicles not only cool you down but also satisfy your chocolate cravings, making them a perfect snack for all occasions.
Ingredients
Gather the following ingredients to whip up your batch of Creamy Chocolate Popsicles. You can easily find these items in your local grocery store. For a smooth and rich flavor, consider using high-quality ingredients, especially when it comes to cocoa powder and milk. Here’s what you’ll need:
- Wet Ingredients:
- 1 ½ cups coconut milk (or any dairy milk of your choice, such as whole or almond milk for a lighter option; coconut milk gives a fantastic creamy texture that enhances the overall popsicle experience)
- ½ cup sweetened condensed milk (or coconut cream for a dairy-free option; this adds a velvety richness and enhances the popsicle’s creaminess, making each bite a delightful treat)
- 1 teaspoon pure vanilla extract (for a lovely aromatic note and to balance the chocolate flavor; it also adds a touch of sophistication to the overall taste profile)
- Dry Ingredients:
- ½ cup unsweetened cocoa powder (choose a high-quality cocoa for a deeper flavor; this is essential for creating that rich chocolate taste that chocolate lovers crave)
- ¼ cup granulated sugar (adjust based on your sweetness preference; you can use brown sugar for a more caramel-like taste that complements chocolate beautifully)
- Pinch of salt (to enhance the chocolate flavor; even a small amount can make a big difference, bringing out the richness of the cocoa)
- Toppings (optional):
- Chopped nuts (like almonds or hazelnuts for added crunch and a nutty flavor that pairs beautifully with chocolate; they also provide a delightful textural contrast)
- Shredded coconut (unsweetened or sweetened, depending on your preference; this adds a tropical flair, making each popsicle feel like a mini vacation)
- Chocolate chips (mini or regular, for extra chocolatey goodness; a great way to amplify the chocolate experience and create a fun surprise with each bite)
- Fresh berries (such as raspberries or strawberries for a pop of color and flavor; they bring a fresh, tangy contrast to the creamy chocolate, elevating the overall taste)
Note: For vegan chocolate popsicles, ensure your sweetened condensed milk is plant-based or substitute with additional coconut cream. Using high-quality cocoa powder will enhance the flavor of your popsicles significantly, allowing the chocolate to shine through. Check out our related guide for more tips on ingredient selection. The quality of your ingredients is crucial, as they directly affect the taste and texture of your popsicles, ensuring that every bite is a delicious experience that you won’t forget.
Steps / Instructions
- Prepare Your Mixture: In a mixing bowl, combine the cocoa powder, granulated sugar, and salt. Whisk these dry ingredients together to ensure there are no clumps. This step is essential to achieving a smooth chocolate base for your popsicles, as it ensures that all dry components are evenly distributed, creating a uniform flavor throughout the popsicle.
- Add Wet Ingredients: Pour in the coconut milk, sweetened condensed milk, and vanilla extract. Whisk everything together until smooth and creamy. The mixture should be well-combined with a glossy finish, ensuring that the cocoa and sugar are fully dissolved for an even flavor throughout. The texture should be thick yet pourable, resembling a rich chocolate sauce that promises a delightful treat.
- Taste Test: Before pouring into molds, taste the mixture. Adjust the sweetness by adding more sugar or cocoa powder if desired. This is the time to make it perfect! Remember that the popsicles will taste slightly less sweet once frozen, so be bold with your adjustments. If you want a deeper chocolate flavor, add a bit more cocoa powder and taste again until satisfied; this will ensure that your Creamy Chocolate Popsicles are irresistibly delicious.
- Pour into Molds: Carefully pour the chocolate mixture into your popsicle molds. Leave a little space at the top to allow for expansion during freezing. This can prevent spills and ensure a nice shape when frozen. If you’re using silicone molds, the popsicles will be easier to extract later, making for a more enjoyable serving experience.
- Add Sticks: If your molds require sticks, insert them into the mixture. Make sure they stand upright and straight. If your molds are flexible, gently wiggle the sticks into place to avoid any spills. This will help keep them centered and make removal easier, ensuring that your popsicles come out perfectly shaped.
- Freeze: Place the molds in the freezer. Allow the popsicles to freeze for at least 4-6 hours, or until completely solid. For best results, freeze overnight to develop a firm texture that holds together well when removed from the molds. Avoid opening the freezer frequently during this time to maintain a consistent temperature, as this can affect the freezing process.
- Remove and Serve: To remove the popsicles from the molds, run warm water over the outside of the molds for a few seconds. Gently pull on the sticks to release the popsicles. Serve immediately or store in an airtight container in the freezer to maintain their quality. Enjoy each bite of your creamy chocolate delight! If you want to make them even more special, consider dipping them in melted chocolate before serving for an extra indulgent treat.
Tips & Tricks
To ensure your Creamy Chocolate Popsicles turn out perfectly, keep the following tips in mind:
- Storage: Store your popsicles in an airtight container or wrapped in plastic wrap to prevent freezer burn. This will help maintain their flavor and texture for longer periods, ensuring you can enjoy them at your leisure. Make sure to label the container with the date for reference, so you know when they were made.
- Make-Ahead: These popsicles can be made days in advance, making them a great addition to summer gatherings or picnics. They can serve as a refreshing dessert option that you can have ready to go. Consider making a double batch to ensure there’s enough for everyone, as they are sure to be a hit!
- Common Mistakes: Avoid over-mixing the ingredients once the wet and dry components are combined. Over-mixing can lead to a gritty texture that detracts from the creamy experience. Aim for just enough mixing to combine the ingredients smoothly, and stop as soon as it looks consistent for the best results.
- Customization: Feel free to experiment with different types of milk, sweeteners, or flavorings to suit your dietary needs. This versatility allows you to adapt the recipe to your dietary restrictions or preferences, meaning everyone can enjoy these popsicles regardless of their diet. The ability to customize makes this recipe even more appealing!
Variations
If you want to explore different flavor profiles, here are some creative ideas:
- Mint Chocolate: Add a few drops of peppermint extract to the mixture for a refreshing twist. This variation is perfect for mint chocolate lovers! The coolness of mint pairs beautifully with the richness of chocolate, creating a refreshing treat on a hot day.
- Nutty Chocolate: Stir in some almond or hazelnut butter before pouring into molds for a nutty flavor. This addition not only enhances the taste but also adds creaminess, creating a luxurious texture that elevates the popsicle experience.
- Fruity Chocolate: Add pureed fruits like bananas or strawberries to the mixture for a fruity chocolate popsicle. This can create a delightful contrast to the rich chocolate flavor, adding natural sweetness and vibrant color that makes each bite exciting.
Serving Suggestions
These popsicles are delightful on their own, but you can elevate the experience with some serving suggestions:
- Serve with a drizzle of chocolate sauce and a sprinkle of chopped nuts for added texture. This combination not only looks attractive but also enhances the flavor, creating a pleasing contrast that is visually appealing.
- Pair with fresh whipped cream and berries for a decadent dessert. The creaminess complements the popsicles perfectly, making each bite a delightful experience that will impress your guests.
- Offer alongside a refreshing beverage like Refreshing Strawberry Apple Cream Punch for a perfect summer treat. This pairing can create a delightful flavor adventure, satisfying all your taste buds and enhancing your summer festivities.
Now that you’re ready to dive into this easy and satisfying recipe, gather your ingredients and prepare for a delightful experience with Creamy Chocolate Popsicles. Enjoy the rich chocolate flavors and creamy texture as they melt in your mouth, making summer days even sweeter! Your friends and family will be asking for seconds, so be prepared to share the joy of this delightful treat, creating sweet memories together that you will cherish.
Creamy Chocolate Popsicles
This recipe is not only a kid-friendly treat but also an indulgent dessert for chocolate lovers of all ages. With a rich, creamy texture and a deep chocolate flavor, these popsicles embody the essence of summer fun and relaxation.
Ingredients
- 1 ½ cups coconut milk (or any dairy milk of your choice)
- ½ cup sweetened condensed milk (or coconut cream for a dairy-free option)
- 1 teaspoon pure vanilla extract
- ½ cup unsweetened cocoa powder
- ¼ cup granulated sugar
- Pinch of salt
- Chopped nuts (optional)
- Shredded coconut (optional)
- Chocolate chips (optional)
- Fresh berries (optional)
Directions
In a mixing bowl, combine the cocoa powder, granulated sugar, and salt. Whisk these dry ingredients together to ensure there are no clumps.
Pour in the coconut milk, sweetened condensed milk, and vanilla extract. Whisk everything together until smooth and creamy.
Before pouring into molds, taste the mixture. Adjust the sweetness by adding more sugar or cocoa powder if desired.
Carefully pour the chocolate mixture into your popsicle molds. Leave a little space at the top to allow for expansion during freezing.
If your molds require sticks, insert them into the mixture. Ensure they stand upright and straight.
Place the molds in the freezer. Allow the popsicles to freeze for at least 4-6 hours, or until completely solid.
To remove the popsicles from the molds, run warm water over the outside of the molds for a few seconds. Gently pull on the sticks to release the popsicles.
Nutrition Facts
Recipe Reviews
- ★★★★★
Excellent recipe!
Leave a Reply
Your email address will not be published. Required fields are marked *


Excellent recipe!