As summer approaches, the quest for cool, refreshing treats intensifies, and there’s nothing quite like a homemade popsicle to satisfy that craving. Enter the Creamy Chocolate-Bottom Popsicles—a delightful blend of creamy chocolate goodness topped with your favorite fruity flavors. This recipe is not just a fun culinary project; it’s a gateway to enjoying a frozen dessert that’s both indulgent and versatile. Picture this: a warm afternoon, a frozen treat in hand, and the rich, chocolatey flavor melting into a refreshing burst of fruit at every bite. It’s a treat that can be enjoyed by kids and adults alike, making it perfect for summer gatherings, birthday parties, or just a cozy afternoon snack. The combination of textures and flavors in these popsicles not only tantalizes the taste buds but also makes them a visually appealing dessert. Beyond their aesthetic, popsicles have a nostalgic quality that reminds many of childhood summers, spent outdoors with friends and family. Let’s delve into the details that make these popsicles irresistible!
Ingredients
For the Creamy Chocolate-Bottom Popsicles, gather the following ingredients: You can learn more about this topic. Using high-quality ingredients can significantly enhance the flavor and texture of your popsicles, so consider these notes when preparing your shopping list. Fresh ingredients not only impact taste but can also provide different textures in the popsicle layers, making each bite a delicious experience.
- Chocolate Layer:
- 1 cup dark chocolate chips (or dairy-free chocolate chips for a vegan option). Look for brands with a high cocoa content for a richer flavor. A chocolate with at least 70% cocoa will yield the best results, giving your popsicles a deep, satisfying chocolate taste.
- 1 tablespoon coconut oil (for a smooth texture). This oil not only helps in achieving a silky chocolate layer but also adds a hint of coconut flavor. The coconut oil will also help the chocolate layer to melt beautifully in your mouth, enhancing the overall experience.
- Creamy Layer:
- 1 cup coconut milk (full-fat for creaminess, or almond milk for a lighter option). Full-fat coconut milk will yield a richer, creamier texture that complements the chocolate perfectly. It’s preferable to use refrigerate coconut milk rather than canned for a smoother blend.
- 1/4 cup maple syrup (adjust based on desired sweetness). Maple syrup gives a unique flavor profile, but honey or agave can also be used as alternatives. The sweetness can be adjusted based on the ripeness of the fruit layer you choose.
- 1 teaspoon vanilla extract. Opt for pure vanilla extract for the best flavor. If you can find vanilla bean paste, it adds an exceptional depth of flavor and tiny flecks for a gourmet touch.
- Fruit Layer:
- 2 cups fresh or frozen fruit (such as strawberries, blueberries, or mango). Fresh fruit provides vibrant flavor, but frozen fruit can offer convenience without sacrificing taste. If using frozen fruit, ensure it is thawed and drained to avoid excess water in your popsicles.
- 2 tablespoons honey or agave syrup (optional, depending on fruit sweetness). Taste your fruit first to determine if additional sweetener is necessary. Ripe fruits can often provide enough natural sweetness on their own.
Note: Feel free to customize the fruit layer based on your preferences or seasonal availability. This flexibility allows for endless flavor possibilities in your homemade popsicles! Check out our related guide for more tips on ingredient substitutions and seasonal fruit ideas. Experimenting with different fruit combinations can lead to delightful surprises, enhancing your enjoyment of these Creamy Chocolate-Bottom Popsicles.
Steps / Instructions
- Prepare the Chocolate Layer: In a microwave-safe bowl, combine the dark chocolate chips and coconut oil. Microwave in 30-second intervals, stirring in between, until the mixture is smooth and fully melted. This should take about 1 to 2 minutes. Be careful not to overheat! A smooth mixture ensures a glossy finish on your chocolate layer. If desired, you can also melt the mixture over a double boiler for more control over the temperature.
- Pour the Chocolate Layer: Divide the melted chocolate evenly among popsicle molds, filling each about one-third full. Let the chocolate layer set in the freezer for about 10-15 minutes until firm. Checking for firmness is crucial; you want a solid base that will hold up well when adding subsequent layers. Consider tapping the molds gently on the counter to settle the chocolate and remove any air bubbles.
- Mix the Creamy Layer: In a mixing bowl, whisk together the coconut milk, maple syrup, and vanilla extract until well combined. This creamy layer adds richness and balances the chocolate. Make sure to blend thoroughly for a homogenous mixture that ensures each popsicle has that creamy texture. For an extra indulgent touch, you can add a pinch of sea salt to enhance the sweetness.
- Layer the Creamy Mixture: Once the chocolate layer is firm, remove the molds from the freezer and pour the creamy layer over the chocolate. Fill each mold to about two-thirds full. Return the molds to the freezer for another 15-20 minutes until this layer is set. You can gently tap the molds on the counter to remove any air bubbles for a smoother finish. Watching the layers set is part of the fun!
- Prepare the Fruit Layer: If using fresh fruit, wash and chop it into small pieces. If using frozen fruit, allow it to thaw slightly and mash it with a fork. Mix with honey or agave syrup if desired for additional sweetness. The fruit should be well-mixed to create a uniform layer that enhances each bite with flavor. A good tip is to reserve some small fruit pieces to fold into the layer for added texture.
- Top with Fruit Layer: Once the creamy layer is set, carefully spoon the fruit mixture on top of each popsicle mold. Leave a little space at the top to allow for expansion as the popsicles freeze. This will ensure that the popsicles are filled without overflowing. You can also create a fun pattern by layering different fruits or arranging them in a visually appealing way.
- Insert Sticks and Freeze: Insert popsicle sticks into each mold. Freeze for at least 4-6 hours, or until completely solid. This thorough freezing is essential to achieving a popsicle that holds its shape when removed from the mold. For best results, consider leaving them in the freezer overnight, ensuring they are perfectly set for serving.
- Unmold and Enjoy: To release the popsicles, run warm water on the outside of the molds for a few seconds. Gently pull on the sticks to remove the popsicles. Enjoy your Creamy Chocolate-Bottom Popsicles right away or store them in a zip-top bag in the freezer for later! These popsicles can make for a delightful treat at any time of day. Remember to savor each bite to fully appreciate the delightful blend of flavors and textures.
Tips & Tricks
- Storage: Keep your popsicles in an airtight container or zip-top bag in the freezer to maintain their freshness. They can last for up to a month. Label the bags with the date for easy tracking, which helps you enjoy them at their peak freshness.
- Make-Ahead: These popsicles are an excellent make-ahead treat. Prepare them a day or two in advance for a quick grab-and-go snack! This is especially useful for busy weekdays or planned summer outings. Having these popsicles ready can save time and provide a healthy option for kids and adults alike.
- Prevent Sticking: If you find that the popsicles stick to the molds, try lightly greasing the molds with coconut oil before pouring in the chocolate. This will make removal easier and prevent any frustrating breakage. You can also run a thin spatula along the sides of the molds to help release them.
- Experiment with Flavors: Don’t hesitate to mix different fruits or add-ins like shredded coconut or nuts to the fruity layer for added texture and flavor. Consider adding a layer of yogurt for a tangy twist! The possibilities are endless, making it easy to cater to varying tastes or dietary needs.
- Check for Set Times: Make sure to check the popsicles periodically while they freeze to ensure each layer is set properly before adding the next. This helps prevent any mixing of layers, ensuring a beautiful and distinct look in your finished popsicles. Patience pays off when it comes to achieving the perfect layered popsicle.
Conclusion
With just a few simple ingredients and steps, you can create these delicious Creamy Chocolate-Bottom Popsicles that are sure to impress. They are perfect for hot days, gatherings, or simply indulging in a little homemade goodness. So why not gather your ingredients and start experimenting with your own flavor combinations? Your taste buds will thank you for the delightful treat that combines rich chocolate and refreshing fruit in every bite! Sharing these popsicles with friends or family can turn an ordinary day into a special occasion.
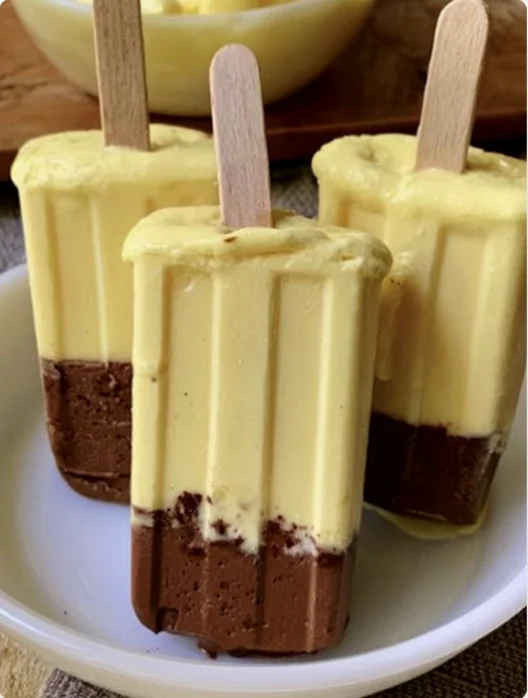
A delightful blend of creamy chocolate goodness topped with your favorite fruity flavors, perfect for summer gatherings or a cozy afternoon snack.
Ingredients
- 1 cup dark chocolate chips (or dairy-free chocolate chips for a vegan option)
- 1 tablespoon coconut oil
- 1 cup coconut milk (full-fat for creaminess, or almond milk for a lighter option)
- 1/4 cup maple syrup (adjust based on desired sweetness)
- 1 teaspoon vanilla extract
- 2 cups fresh or frozen fruit (such as strawberries, blueberries, or mango)
- 2 tablespoons honey or agave syrup (optional, depending on fruit sweetness)
Instructions
In a microwave-safe bowl, combine the dark chocolate chips and coconut oil. Microwave in 30-second intervals, stirring in between, until the mixture is smooth and fully melted. This should take about 1 to 2 minutes.
Divide the melted chocolate evenly among popsicle molds, filling each about one-third full. Let the chocolate layer set in the freezer for about 10-15 minutes until firm.
In a mixing bowl, whisk together the coconut milk, maple syrup, and vanilla extract until well combined.
Once the chocolate layer is firm, remove the molds from the freezer and pour the creamy layer over the chocolate. Fill each mold to about two-thirds full. Return the molds to the freezer for another 15-20 minutes until this layer is set.
If using fresh fruit, wash and chop it into small pieces. If using frozen fruit, allow it to thaw slightly and mash it with a fork. Mix with honey or agave syrup if desired for additional sweetness.
Once the creamy layer is set, carefully spoon the fruit mixture on top of each popsicle mold. Leave a little space at the top to allow for expansion as the popsicles freeze.
Insert popsicle sticks into each mold. Freeze for at least 4-6 hours, or until completely solid.
To release the popsicles, run warm water on the outside of the molds for a few seconds. Gently pull on the sticks to remove the popsicles.
Recipe Reviews
- ★★★★★
Excellent recipe!
Leave a Reply
Your email address will not be published. Required fields are marked *

Excellent recipe!