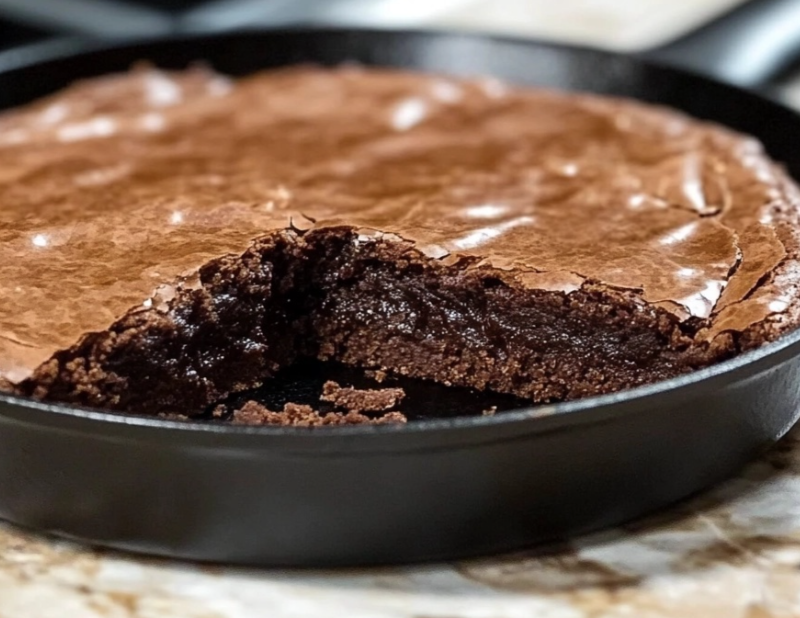
Cast Iron Skillet Brownie: A Decadent and Delicious Treat
Introduction
Indulging in a warm and gooey brownie is a simple pleasure that brings joy to many. The rich chocolate flavor combined with the fudgy texture is undeniably irresistible. And what better way to elevate this classic dessert than by baking it in a cast iron skillet?
In this article, we will explore the art of making a cast iron skillet brownie. We will dive into the ingredients needed, the step-by-step process, variations to customize your brownie, and some helpful tips along the way. So, grab your apron and let’s get started on this mouthwatering baking adventure!
Ingredients
Before we begin, let’s gather the essential ingredients for our cast iron skillet brownie. The following list will ensure you have everything you need:
– 1 cup of all-purpose flour
– 1 cup of granulated sugar
– ½ cup of unsweetened cocoa powder
– ½ teaspoon of salt
– ½ cup of unsalted butter, melted
– 2 large eggs
– 1 teaspoon of vanilla extract
– ½ cup of chocolate chips (optional)
Steps
Now that we have all the ingredients ready, it’s time to dive into the step-by-step process of creating a heavenly cast iron skillet brownie. Follow these instructions carefully for a perfect outcome:
1. Preheat your oven to 350°F (175°C) and grease your cast iron skillet with butter or cooking spray. This ensures the brownie will easily release from the skillet once baked.
2. In a large mixing bowl, combine the flour, sugar, cocoa powder, and salt. Whisk them together until well combined, ensuring there are no lumps.
3. In a separate bowl, whisk together the melted butter, eggs, and vanilla extract until the mixture is smooth and well incorporated.
4. Gradually pour the wet ingredients into the dry mixture, stirring continuously until you achieve a smooth batter. Be careful not to overmix, as this can result in a dense brownie.
5. If desired, fold in the chocolate chips to add an extra burst of chocolatey goodness to your brownie batter.
6. Pour the batter into the greased cast iron skillet, spreading it evenly with a spatula.
7. Place the skillet in the preheated oven and bake for approximately 25-30 minutes. Keep a close eye on the brownie towards the end of the baking time to ensure it doesn’t overcook. The brownie should have a slightly crisp top and a fudgy center.
8. Once baked, remove the skillet from the oven and allow the brownie to cool for a few minutes before serving. This helps it set and makes it easier to cut into delectable slices.
Variations
While the classic cast iron skillet brownie is undeniably delicious on its own, there are several variations you can explore to add your own twist to this delightful treat. Here are a few ideas to inspire your creativity:
Salted Caramel Swirl Brownie
To take your cast iron skillet brownie to the next level, drizzle a generous amount of salted caramel sauce over the batter before baking. The combination of the rich chocolate and the sweet-salty caramel creates an irresistible flavor profile.
Nutella Stuffed Brownie
For all the Nutella lovers out there, why not take your brownie to new heights by adding a layer of Nutella in the middle? Simply pour half of the batter into the skillet, spread a thick layer of Nutella on top, and then pour the remaining batter to cover it. The result is a heavenly surprise of gooey Nutella in every bite.
Mint Chocolate Chip Brownie
If you’re a fan of the refreshing combination of mint and chocolate, try adding a teaspoon of peppermint extract to the batter and folding in some chocolate chips. This variation will give your brownie a cool and invigorating twist.
Feel free to experiment with different flavors and ingredients to create your own signature cast iron skillet brownie!
Tips
To ensure your cast iron skillet brownie turns out perfectly every time, here are some helpful tips to keep in mind:
– Use a well-seasoned cast iron skillet to prevent the brownie from sticking to the pan.
– Don’t overmix the batter. Stir until the ingredients are just combined to maintain a tender texture.
– Allow the brownie to cool slightly before serving to enhance its flavor and make it easier to handle.
– Serve the brownie warm with a scoop of vanilla ice cream or a dollop of whipped cream for an extra treat.
Conclusion
Baking a cast iron skillet brownie is a delightful experience that results in a heavenly dessert. The combination of the rich chocolate flavor, the fudgy texture, and the crispy top makes this treat a crowd-pleaser.
Whether you choose to stick with the classic recipe or explore variations to suit your taste, the cast iron skillet brownie is sure to satisfy your sweet tooth. So, gather your ingredients, preheat your oven, and embark on this delicious baking adventure. Your taste buds will thank you!
FAQs
1. Can I use a different type of pan if I don’t have a cast iron skillet?
While a cast iron skillet is ideal for baking a brownie due to its ability to distribute heat evenly, you can use a similar-sized oven-safe pan if needed. Just be sure to adjust the baking time accordingly.
2. Can I use dark cocoa powder instead of unsweetened cocoa powder?
Yes, you can use dark cocoa powder if you prefer a more intense chocolate flavor. Just keep in mind that it may alter the overall taste slightly.
3. How can I store leftover cast iron skillet brownie?
If you have any leftovers (which is rare!), you can store them in an airtight container at room temperature for up to three days. You can also refrigerate them for longer shelf life.
4. Can I freeze the cast iron skillet brownie?
Absolutely! Wrap the cooled brownie tightly in plastic wrap and then place it in a freezer-safe bag or container. It can be stored in the freezer for up to three months. To thaw, simply leave it at room temperature until it’s soft and ready to enjoy.
Now that you have all the information you need, it’s time to put on your apron, preheat that oven, and bake yourself a scrumptious cast iron skillet brownie. Happy baking!