
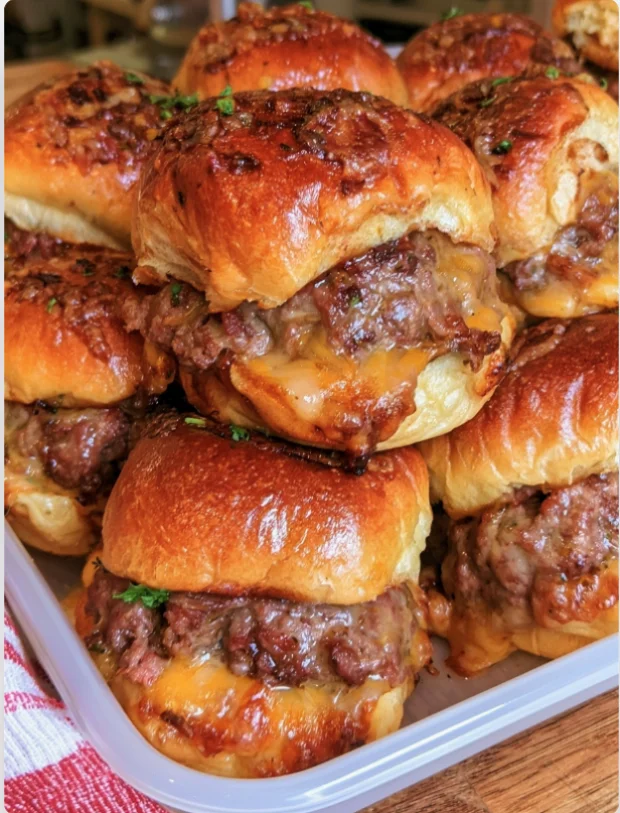
If you’re searching for the ultimate crowd-pleaser that combines savory flavors with delightful textures, look no further than Beef Cheddar Sliders. These mini beef sandwiches are perfect for any occasion, whether it’s a casual get-together, a game day celebration, or a cozy family dinner. What makes this recipe especially appealing is its simplicity and the ability to customize it to your liking, from the choice of toppings to the buns. These sliders are not only delicious but are also a fantastic way to elevate your party food game. Imagine biting into a warm, cheesy slider filled with juicy, seasoned beef, all nestled in a soft homemade bun. This dish brings comfort food to life in a fun, shareable format! The combination of gooey cheddar cheese melting into the beef filling creates a mouthwatering experience that will leave your taste buds dancing. Plus, these sliders can be prepared in advance, making them a great option for busy hosts. They invite creativity, allowing you to play around with different flavors and textures, ensuring that everyone at your gathering leaves satisfied.
Ingredients
- For the Beef Filling:
- 1 pound ground beef (preferably 80/20 for juiciness; this fat content helps keep the sliders moist and flavorful)
- 1 tablespoon Worcestershire sauce (adds a rich, umami flavor that enhances the meat)
- 1 teaspoon garlic powder (for aromatic depth)
- 1 teaspoon onion powder (for a sweet and savory touch)
- Salt and pepper to taste (season well for the best flavor, as this is key to bringing out the beef’s natural taste)
- 1 cup shredded cheddar cheese (sharp or mild, based on preference; sharp cheddar provides a pronounced taste, while mild is more subtle and creamy)
- For the Slider Buns:
- 2 cups all-purpose flour (use high-quality flour for the best texture; consider a brand that’s known for its consistency)
- 1 packet (2 ¼ teaspoons) instant yeast (make sure it’s fresh for proper rising; check the expiration date to ensure effectiveness)
- 2 tablespoons sugar (helps activate the yeast and adds a slight sweetness to balance the savory filling)
- 1 teaspoon salt (balances the sweetness and enhances flavor; don’t skip this step as it is crucial for the overall taste)
- ¾ cup warm milk (about 110°F; too hot can kill the yeast, while too cold won’t activate it, affecting the dough’s rise)
- 2 tablespoons unsalted butter, melted (adds richness and flavor to the buns, contributing to their soft texture)
- 1 egg (for egg wash; gives the buns a beautiful, golden color and shiny finish when baked)
- Toppings:
- Pickles (add a tangy crunch that contrasts beautifully with the savory beef; consider dill or bread and butter for different flavor profiles)
- Sliced onions (red or white for a fresh, crisp flavor; you can also caramelize them for a sweeter taste)
- Mustard, ketchup, or your favorite sauces (these condiments can bring an extra layer of flavor; consider BBQ sauce for a smoky twist or aioli for a gourmet touch)
- Lettuce and tomato (optional; fresh veggies add a refreshing contrast that lightens up the dish)
Note: You can substitute ground turkey or chicken for a lighter option, which will still yield delicious sliders. Additionally, for a gluten-free version, use gluten-free flour for the buns to accommodate dietary needs. You can learn more about this topic. Don’t hesitate to experiment with various toppings and sauces to find your perfect combination, making these Beef Cheddar Sliders uniquely yours! Feel free to indulge in creativity by trying different cheeses or spicy peppers to elevate the flavor profile further.
Steps / Instructions
- Prepare the Slider Buns: In a large mixing bowl, combine the warm milk, sugar, and yeast. Let it sit for 5-10 minutes until it becomes frothy; this ensures the yeast is active and ready to help the dough rise properly. The frothiness is a sign that your yeast is alive and kicking, which is vital for light, fluffy buns.
- Mix in the melted butter and egg to the yeast mixture. In another bowl, whisk together the flour and salt, then gradually add it to the wet ingredients, mixing until a dough forms. The dough should be slightly tacky but not overly sticky; consider adding a touch more flour if it feels too wet.
- Knead the dough on a floured surface for about 5-7 minutes until smooth and elastic. This process develops the gluten, giving the buns a good structure. You can test if it’s ready by gently stretching a piece of dough; it should form a window without tearing. Place it in a greased bowl, cover with a cloth, and let it rise in a warm place for about 1 hour or until doubled in size. A warm oven (turned off) works well for this.
- Make the Beef Filling: While the dough is rising, heat a large skillet over medium heat. Add the ground beef, Worcestershire sauce, garlic powder, onion powder, salt, and pepper. Cook until browned, about 8-10 minutes. Make sure to break the beef up with a spatula as it cooks, ensuring it browns evenly. Drain excess fat if necessary; you want to retain some fat for flavor but not have it swimming in grease.
- Remove from heat and mix in the shredded cheddar cheese until melted and well combined. The heat from the beef will help melt the cheese, creating a gooey filling that perfectly complements the buns. Stir until everything is evenly mixed, ensuring each bite of the slider is cheesy and meaty.
- Shape the Buns: Once the dough has risen, preheat your oven to 375°F (190°C). Punch down the dough and divide it into 12 equal pieces. Shape each piece into a small ball and place them on a greased baking sheet, leaving space between each bun. Proper spacing is crucial to ensure the buns have room to rise without merging into one another.
- Cover the buns with a cloth and let them rise again for about 30 minutes, until puffy. This second rise helps create light and airy buns. You can gently press one with your finger; if it springs back, they’re ready for baking.
- Bake the Buns: Brush the tops of the buns with the egg wash (1 beaten egg) for a golden finish. Bake in the preheated oven for 15-20 minutes or until golden brown. Keep an eye on them in the last few minutes to avoid over-baking, as each oven has its quirks; you want them to be golden and firm to the touch.
- Remove from oven and let cool slightly before slicing each bun horizontally. This makes it easier to assemble the sliders without squishing the filling out. Letting them cool for a few minutes also allows them to stabilize, making slicing easier.
- Assemble the Sliders: Spoon a generous amount of the beef and cheese mixture onto the bottom half of each bun. Top with your desired toppings and place the top half of the bun on. Press down gently to secure the sliders and enhance the meld of flavors! Consider wrapping them in parchment paper or foil for easy serving.
Tips & Tricks
- Storage: Store leftover sliders in an airtight container in the fridge for up to 3 days. Reheat in the oven or microwave before serving. For the best results, consider reheating in the oven to maintain the bun’s texture, as microwaving can make them soggy.
- Make-Ahead: Prepare the beef filling and buns a day in advance. Assemble the sliders just before serving to keep the buns fresh. You can also freeze the assembled sliders wrapped tightly in foil for a quick meal later; they can be frozen for up to 3 months.
- Common Mistakes: Avoid overcooking the beef to keep it juicy. Also, ensure the milk is warm but not too hot to activate the yeast properly. If the dough doesn’t rise, the yeast may be expired or the temperature of the liquid may have been too high; always double-check your ingredients before starting.
- Pro Technique: For extra flavor, consider adding sautéed mushrooms or jalapeños to the beef mixture. You might also experiment with different cheeses, like pepper jack for a spicy kick or gouda for a smokier flavor. Additionally, try adding fresh herbs, such as thyme or basil, to the beef for an aromatic twist.
Conclusion
Beef Cheddar Sliders are a fantastic addition to any gathering, bringing together flavor and convenience in a delightful package. Whether you’re hosting a game day party or looking for an easy dinner option, these sliders are bound to impress. Enjoy the process of making them from scratch, and don’t hesitate to get creative with your toppings. Happy cooking! Check out our related guide for more tips. There’s nothing quite like the satisfaction of serving up these hearty sliders, and the smiles they bring to the faces of your friends and family make it all worthwhile! The joy of sharing these sliders is just as delicious as the meal itself.
Beef Cheddar Sliders
These mini beef sandwiches are perfect for any occasion, whether it's a casual get-together, a game day celebration, or a cozy family dinner. This dish brings comfort food to life in a fun, shareable format!
Ingredients
- 1 pound ground beef (preferably 80/20)
- 1 tablespoon Worcestershire sauce
- 1 teaspoon garlic powder
- 1 teaspoon onion powder
- Salt and pepper to taste
- 1 cup shredded cheddar cheese
- 2 cups all-purpose flour
- 1 packet (2 ¼ teaspoons) instant yeast
- 2 tablespoons sugar
- 1 teaspoon salt
- ¾ cup warm milk (about 110°F)
- 2 tablespoons unsalted butter, melted
- 1 egg (for egg wash)
- Pickles (for topping)
- Sliced onions (for topping)
- Mustard, ketchup, or your favorite sauces (for topping)
- Lettuce and tomato (optional for topping)
Directions
In a large mixing bowl, combine the warm milk, sugar, and yeast. Let it sit for 5-10 minutes until it becomes frothy.
Mix in the melted butter and egg to the yeast mixture. In another bowl, whisk together the flour and salt, then gradually add it to the wet ingredients, mixing until a dough forms.
Knead the dough on a floured surface for about 5-7 minutes until smooth and elastic. Place it in a greased bowl, cover with a cloth, and let it rise in a warm place for about 1 hour or until doubled in size.
While the dough is rising, heat a large skillet over medium heat. Add the ground beef, Worcestershire sauce, garlic powder, onion powder, salt, and pepper. Cook until browned, about 8-10 minutes.
Remove from heat and mix in the shredded cheddar cheese until melted and well combined.
Once the dough has risen, preheat your oven to 375°F (190°C). Punch down the dough and divide it into 12 equal pieces. Shape each piece into a small ball and place them on a greased baking sheet.
Cover the buns with a cloth and let them rise again for about 30 minutes.
Brush the tops of the buns with the egg wash. Bake in the preheated oven for 15-20 minutes or until golden brown.
Remove from oven and let cool slightly before slicing each bun horizontally.
Spoon a generous amount of the beef and cheese mixture onto the bottom half of each bun. Top with your desired toppings and place the top half of the bun on.
Recipe Reviews
- ★★★★★
Excellent recipe!
Leave a Reply
Your email address will not be published. Required fields are marked *


Excellent recipe!