
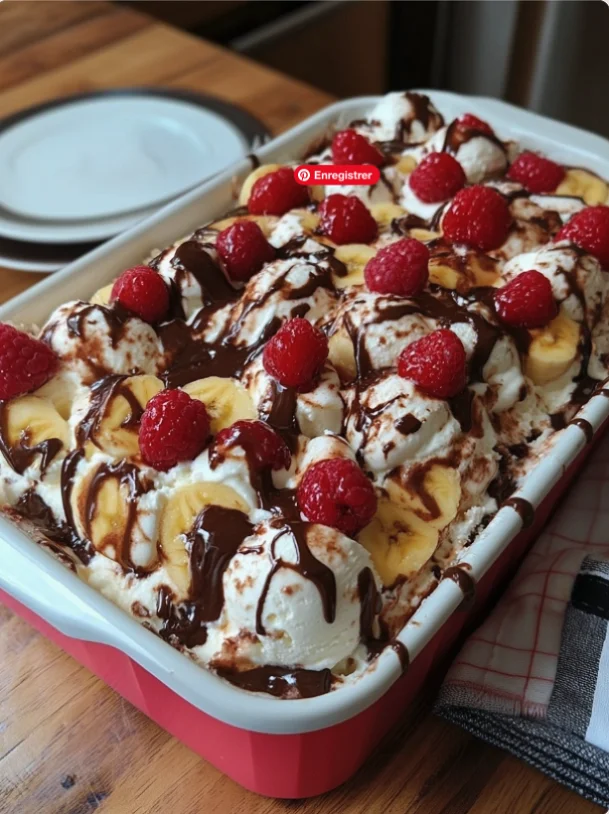
When summer rolls around, few desserts are as delightful and refreshing as a Banana Split Ice Cream Poke Cake. This decadent dessert combines the classic flavors of a beloved ice cream treat into a moist, rich cake. The beauty of this recipe lies in its simplicity; it’s a poke cake that not only looks stunning but also bursts with tropical flavors reminiscent of lazy summer days. With a combination of bananas, chocolate sauce, and whipped cream, this indulgent treat is perfect for parties, barbecues, or a sweet family gathering. Plus, it’s incredibly easy to make, allowing you to focus on creating memories rather than stressing in the kitchen. In fact, poke cakes have become a popular choice for those looking to impress guests with minimal effort, as their unique design allows for beautiful presentations and a blend of flavors that keep people coming back for more. Its origins can be traced back to the mid-20th century, where the poke cake trend gained popularity in American households, making it a nostalgic dessert for many. This versatility of the Banana Split Ice Cream Poke Cake allows it to fit in at virtually any occasion, from casual family dinners to festive gatherings, providing a sweet escape to summer’s blissful flavors.
Ingredients
To create this Banana Split Ice Cream Poke Cake, you’ll need the following ingredients. Make sure to gather everything before you start for a smooth baking experience. You can learn more about this topic. Each ingredient plays a crucial role in developing the cake’s overall flavor and texture, so pay close attention to quality and freshness. Using organic or locally sourced ingredients can enhance the taste and nutrition of your cake, making each slice a little more special.
- For the Cake:
- 1 box of yellow cake mix – choose a high-quality mix for the best results, or make a homemade version if you’re feeling adventurous.
- 3 large eggs – using room temperature eggs can help create a lighter cake. If you forgot to take them out of the fridge, you can soak them in warm water for a few minutes.
- 1 cup of water – using milk instead of water can enhance richness and add creaminess to the cake’s texture.
- 1/2 cup of vegetable oil – this keeps the cake moist; you could also use melted coconut oil for a subtle tropical flavor. For a healthier option, consider using applesauce in place of some of the oil.
- For the Toppings:
- 1 (14-ounce) can of sweetened condensed milk – this adds a creamy sweetness and is essential for the poke effect, infusing the cake with flavor.
- 1 cup of heavy whipping cream – whipping this to stiff peaks creates the luxurious topping. For a lighter option, you could substitute with whipped coconut cream.
- 2 ripe bananas, sliced – ensure they are perfectly ripe for maximum sweetness and flavor; overripe bananas can be used for a deeper banana taste, adding a more intense flavor profile.
- 1 cup of chocolate syrup – choose a high-quality syrup or make your own for a richer flavor. You could even experiment with flavored syrups like caramel or strawberry for a twist.
- 1 cup of crushed pineapple (drained) – the acidity and sweetness of pineapple complements the bananas beautifully, providing a refreshing counterpoint to the richness of the cake.
- 1 cup of chopped walnuts or pecans (optional) – adding nuts gives a delightful crunch and enhances textural contrast. Toasting the nuts beforehand can intensify their flavor.
- Maraschino cherries for garnish – these add a pop of color and a classic touch, making the dessert visually appealing.
- Whipped cream for topping – you can use store-bought or homemade, but homemade will be fluffier and fresher. Consider fluffing in a touch of vanilla extract for extra flavor.
Note: Feel free to use gluten-free cake mix if needed to accommodate dietary restrictions. Ensure your bananas are ripe for maximum sweetness and flavor. Check out our related guide for more tips. If you have dietary restrictions, consider substituting with dairy-free alternatives such as coconut cream and plant-based milk, allowing everyone to enjoy this delicious treat. Always taste your ingredients beforehand, especially the bananas and syrup, to ensure they meet your flavor expectations for this tropical dessert.
Steps / Instructions
- Preheat the Oven: Preheat your oven to 350°F (175°C). Prepare a 9×13 inch baking pan by greasing it lightly with non-stick cooking spray. This ensures that your cake comes out easily and maintains its shape, preventing any frustration when it’s time to serve.
- Prepare the Cake Batter: In a large mixing bowl, combine the yellow cake mix, eggs, water, and vegetable oil. Use an electric mixer on medium speed to mix until fully combined and smooth, about 2-3 minutes. Make sure to scrape down the sides of the bowl to incorporate all ingredients evenly, avoiding any lumps for a smooth batter.
- Bake the Cake: Pour the batter into the prepared baking pan and spread it evenly. Bake in the preheated oven for 25-30 minutes or until a toothpick inserted into the center comes out clean. Watch for a lightly golden top and a springy texture as indicators of doneness. Allow the cake to cool in the pan for about 10 minutes, which helps prevent breakage during transfer.
- Poke Holes in the Cake: Once the cake has cooled slightly, use the handle of a wooden spoon or a skewer to poke holes all over the top of the cake. Aim for about 20-25 holes, ensuring they reach nearly to the bottom. This step is crucial as it allows the sweetened condensed milk to seep through, making each bite flavorful and moist, transforming the texture into something delightful.
- Pour the Sweetened Condensed Milk: Drizzle the sweetened condensed milk over the poked cake, making sure it fills the holes. Allow the cake to absorb the milk for at least 30 minutes at room temperature. For optimal flavor absorption, consider making this step the day before and refrigerating it overnight, giving the cake even more time to soak up the deliciousness.
- Add the Fruit: After the cake has absorbed the milk, spread the sliced bananas and crushed pineapple evenly over the top of the cake. This layer not only adds flavor but also a beautiful presentation, reminiscent of the traditional banana split. The addition of fruit not only boosts the cake’s appearance but adds freshness and a burst of flavor.
- Prepare the Whipped Cream: In a medium bowl, whip the heavy cream using an electric mixer until stiff peaks form. This should take about 3-5 minutes. Gently spread the whipped cream over the fruit layer, creating a luscious topping that balances the sweetness below. For added flavor, consider folding in a teaspoon of vanilla extract or a sprinkle of powdered sugar before spreading.
- Drizzle with Chocolate Sauce: Generously drizzle chocolate syrup over the whipped cream, allowing it to cascade down the sides of the cake. The visual appeal of the dripping chocolate adds to the dessert’s allure, making it irresistible to guests and family alike.
- Chill the Cake: Cover the cake with plastic wrap and refrigerate for at least 2 hours or until ready to serve. This chilling time helps the flavors meld together and makes it easier to slice. A well-chilled cake is not only more refreshing but also enhances the overall experience, ensuring every slice is perfectly set.
- Serve: Before serving, top with additional whipped cream, nuts, and maraschino cherries for a delightful presentation. Slice into squares and enjoy! You could also serve this delightful cake with a scoop of vanilla ice cream for an extra indulgent experience. Pairing it with a refreshing beverage like iced tea or lemonade can elevate the dessert experience further.
Tips & Tricks
To ensure your Banana Split Ice Cream Poke Cake turns out perfectly, here are some helpful tips:
- Storage: Store any leftovers in an airtight container in the refrigerator for up to 3 days. The cake will continue to absorb moisture, which may enhance the flavor. If you notice it becoming too moist, consider serving it in bowls with a spoon, which can also add a fun twist to serving.
- Make-Ahead Option: This cake can be made a day in advance. Prepare as directed, but wait to add the whipped cream and toppings until just before serving for the best texture. This keeps the whipped cream fluffy and prevents it from getting soggy, ensuring each bite is fresh and delightful.
- Avoid Common Mistakes: Make sure to properly drain the crushed pineapple to prevent the cake from becoming soggy. Also, use ripe bananas, as they provide the best flavor. Check for any overly brown spots on the bananas, which can indicate overripeness, as these can affect the overall sweetness.
- Professional Tip: If you want a more pronounced banana flavor, mash an additional banana and mix it into the whipped cream before spreading it over the cake. You could also sprinkle some banana extract for an enhanced taste, amplifying the banana experience further.
Conclusion
Now that you have the recipe for a delectable Banana Split Ice Cream Poke Cake, it’s time to bring it to life. This dessert not only satisfies your sweet cravings but also brings a smile to anyone who gets to indulge in it. Perfect for sunny days and celebrations alike, this cake is sure to be a hit. So gather your ingredients, follow the steps, and enjoy creating this delightful treat for your friends and family! You’ll find that sharing this cake can create lasting memories, as the joy of dessert often brings everyone together. Your Banana Split Ice Cream Poke Cake is bound to become a cherished favorite, leaving everyone asking for the recipe!
Banana Split Ice Cream Poke Cake
This decadent dessert combines the classic flavors of a beloved ice cream treat into a moist, rich cake. The beauty of this recipe lies in its simplicity; it’s a poke cake that not only looks stunning but also bursts with tropical flavors reminiscent of lazy summer days.
Ingredients
- 1 box of yellow cake mix
- 3 large eggs
- 1 cup of water
- 1/2 cup of vegetable oil
- 1 (14-ounce) can of sweetened condensed milk
- 1 cup of heavy whipping cream
- 2 ripe bananas, sliced
- 1 cup of chocolate syrup
- 1 cup of crushed pineapple (drained)
- 1 cup of chopped walnuts or pecans (optional)
- Maraschino cherries for garnish
- Whipped cream for topping
Directions
Preheat your oven to 350°F (175°C). Prepare a 9x13 inch baking pan by greasing it lightly with non-stick cooking spray.
In a large mixing bowl, combine the yellow cake mix, eggs, water, and vegetable oil. Use an electric mixer on medium speed to mix until fully combined and smooth, about 2-3 minutes.
Pour the batter into the prepared baking pan and spread it evenly. Bake in the preheated oven for 25-30 minutes or until a toothpick inserted into the center comes out clean.
Once the cake has cooled slightly, use the handle of a wooden spoon or a skewer to poke holes all over the top of the cake.
Drizzle the sweetened condensed milk over the poked cake, making sure it fills the holes. Allow the cake to absorb the milk for at least 30 minutes at room temperature.
After the cake has absorbed the milk, spread the sliced bananas and crushed pineapple evenly over the top of the cake.
In a medium bowl, whip the heavy cream using an electric mixer until stiff peaks form. Gently spread the whipped cream over the fruit layer.
Generously drizzle chocolate syrup over the whipped cream.
Cover the cake with plastic wrap and refrigerate for at least 2 hours or until ready to serve.
Before serving, top with additional whipped cream, nuts, and maraschino cherries.
Nutrition Facts
Recipe Reviews
- ★★★★★
Excellent recipe!
Leave a Reply
Your email address will not be published. Required fields are marked *



Excellent recipe!