The Ultimate Guide to No-Churn Homemade Ice Cream: 7 Delicious Flavors Without an Ice Cream Maker
Nothing quite matches the sheer satisfaction of a cold, velvety scoop of homemade ice cream on a warm afternoon. For generations, crafting frozen custard and artisanal gelato at home required clunky, expensive ice cream makers, pre-freezing heavy metal bowls for twenty-four hours, or constantly churning rock salt and ice.
Fortunately, a revolutionary culinary technique completely changes the game: 2-Ingredient No-Churn Homemade Ice Cream.
With just two simple pantry staples—heavy whipping cream and sweetened condensed milk—you can produce an exceptionally rich, silky-smooth, scoopable ice cream that rivals any boutique parlor. This comprehensive guide walks you through the core science behind no-churn ice cream, the essential kitchen tools you need, the master base formula, 7 irresistible flavor variations, critical troubleshooting tips, storage best practices, and answers to frequently asked questions.
Why the No-Churn Method Works: The Science of Texture
Traditional ice cream relies on continuous mechanical churning while chilling. This process accomplishes two essential tasks:
-
It incorporates tiny air bubbles into the liquid base (referred to in commercial production as overrun), creating a light, airy structure.
-
It prevents ice crystals from binding together and growing into large, crunchy shards.
When you eliminate the ice cream machine, you need an alternative method to accomplish both objectives. That is where heavy cream and sweetened condensed milk come in:
-
Heavy Whipping Cream (Structure & Air): Whipping cold heavy cream to stiff peaks traps millions of microscopic air pockets inside a stable network of milk fats. This provides the exact same light, fluffy texture that an electric churn achieves.
-
Sweetened Condensed Milk (Smoothness & Antifreeze): Water freezes into solid ice crystals, but sugar and alcohol lower the freezing point of liquids. Sweetened condensed milk is whole milk cooked down until roughly 60% of its water content evaporates, leaving concentrated milk solids and sugar. The low water content combined with high natural sugar concentration prevents crystallization, ensuring a soft, scoopable texture directly from the freezer.
Essential Kitchen Equipment
You do not need specialized appliances to make gourmet ice cream at home. The required tools are standard essentials found in almost every home kitchen:
-
Electric Hand Mixer or Stand Mixer: Essential for whipping the heavy cream to stable, stiff peaks quickly and without arm fatigue.
-
Large Mixing Bowls: Metal or glass bowls work best because they chill quickly and retain low temperatures.
-
Silicone Spatula: For gently folding the whipped cream into the condensed milk base without deflating trapped air.
-
Freezer-Safe Storage Container: A standard 9×5-inch metal loaf pan, a ceramic dish, or a dedicated reusable silicone/plastic ice cream tub with an airtight lid.
-
Plastic Cling Wrap: Placed directly against the surface of the ice cream mixture to block ambient freezer air and stop ice crystals from forming.
The Master 2-Ingredient Base Formula
Every no-churn flavor starts with this universal foundation. It requires zero cooking, no tempering of egg yolks, and only 10 minutes of active prep work.
Base Ingredients
-
2 cups (480 ml) Heavy Whipping Cream: Must contain at least 36% to 40% milk fat and be thoroughly chilled.
-
1 can (14 oz / 396 g) Sweetened Condensed Milk: Thoroughly chilled in the refrigerator for optimal blending.
-
1 tablespoon Pure Vanilla Extract or Vanilla Bean Paste: Rounds out the flavor and provides a small amount of alcohol, which further aids a soft, smooth scoop.
7 Irresistible Flavor Variations
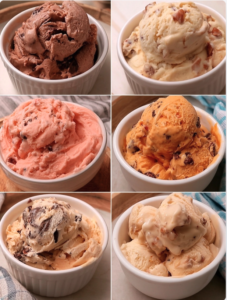
Once you master the base formula, you can transform it into countless combinations. Here are seven balanced flavor profiles you can create at home:
1. Double Chocolate Chunk
-
Mix-ins: 1/2 cup Dutch-process cocoa powder (sifted into the condensed milk) and 3/4 cup chopped dark chocolate chunks or mini chocolate chips.
-
Method: Whisk the sifted cocoa powder directly into the sweetened condensed milk before folding in the whipped cream. Fold in the chocolate chunks right before transferring to the loaf pan.
2. Butter Pecan Toffee Crunch
-
Mix-ins: 1 cup chopped pecans toasted in 2 tablespoons of melted salted butter, plus 1/2 cup crunchy toffee bits.
-
Method: Toast the pecans in a skillet with melted butter over medium heat for 3–4 minutes until fragrant. Let them cool completely to room temperature. Fold the cooled pecans and toffee bits into the prepared ice cream base.
3. Fresh Strawberry Swirl & Mini Dark Chocolate Chips
-
Mix-ins: 1 cup fresh strawberries simmered down into a thick reduction (or 1/2 cup premium strawberry preserves) and 1/3 cup mini dark chocolate chips.
-
Method: Simmer diced strawberries with 1 tablespoon of sugar over low heat until reduced to a jam-like consistency; chill thoroughly. Fold the chocolate chips into the base, then layer the strawberry reduction throughout the cream and gently swirl with a butter knife.
4. Salted Caramel Pretzel Crunch
-
Mix-ins: 1/2 cup thick salted caramel sauce (dulce de leche or store-bought caramel), 1/2 cup crushed salted pretzel pieces, and a pinch of flaky sea salt.
-
Method: Fold crushed pretzels into the base. Pour half the mixture into your pan, drizzle with caramel sauce, pour the remaining mixture, and top with an additional caramel swirl and a pinch of Maldon flaky salt.
5. Classic Cookies & Cream (Oreo Dream)
-
Mix-ins: 15 to 18 Oreo cookies, roughly chopped into a mix of fine crumbs and crunchy chunks.
-
Method: Fold the crushed cookies into the base. The fine crumbs tint the ice cream a light grey and add cookie flavor to every bite, while larger pieces provide textural contrast.
6. Creamy Coffee Mocha Fudge
-
Mix-ins: 2 tablespoons instant espresso powder (or instant coffee granules) dissolved in 1 tablespoon warm water (then chilled), plus 1/3 cup hot fudge sauce.
-
Method: Whisk the dissolved coffee concentrate into the sweetened condensed milk. Fold in the whipped cream, layer into your freezing container with ribbons of hot fudge, and create a decorative top swirl.
7. Mango Passionfruit Tropical Cream
-
Mix-ins: 1/2 cup smooth Alphonso mango puree and 2 tablespoons passionfruit pulp (or lime zest).
-
Method: Fold 2 tablespoons of lime zest and half the mango puree into the base. Swirl the remaining mango puree on top for a vibrant, fruity balance against the rich cream.
Step-by-Step Master Instructions
Following the proper sequence ensures your no-churn ice cream achieves an ultra-creamy consistency without separating or developing ice crystals.
-
Chill Your Equipment: Place your metal mixing bowl and mixer beaters in the freezer for 15 minutes before starting. Keeping your tools ice-cold helps the fat in the heavy cream trap air quickly and hold its shape.
-
Whip the Heavy Cream: Pour cold heavy cream into the chilled bowl. Beat on medium-high speed using a hand mixer or stand mixer fitted with the whisk attachment for 3–4 minutes until stiff peaks form. You will know it is ready when lifting the beaters creates sharp, upright peaks that do not collapse.
-
Mix the Base Flavoring: In a separate large bowl, whisk together the chilled sweetened condensed milk, vanilla extract, and any liquid flavorings (such as cocoa powder, coffee concentrate, or citrus extracts).
-
Lighten the Base: Scoop roughly one-third of the whipped cream into the condensed milk mixture. Use your silicone spatula to stir it in smoothly. This lightens the dense condensed milk so the remaining cream blends in without losing volume.
-
Gently Fold: Add the remaining two-thirds of the whipped cream. Using gentle, circular under-and-over motions with your spatula, fold the mixtures together just until no white streaks remain. Avoid vigorous stirring, which can deflate the whipped air pockets.
-
Incorporate Mix-ins: Gently fold in your choice of crunchy additions (cookies, nuts, chocolate chips) or layer and swirl your ribbons (caramel, fudge, fruit purees).
-
Cover and Freeze: Pour the mixture into a clean 9×5-inch loaf pan or freezer container. Press a sheet of plastic wrap directly onto the surface of the ice cream to prevent contact with air. Freeze on a flat shelf for a minimum of 6 hours, or ideally overnight (8–12 hours), until firm and scoopable.
Comparison: Traditional Churned vs. No-Churn Ice Cream
5 Pro Tips for Flawless Results
-
Always Choose Full-Fat Heavy Cream: Do not substitute heavy whipping cream with half-and-half, whole milk, or light culinary creams. The 36%+ fat content is chemically required to establish a firm foam structure that remains soft when frozen.
-
Avoid High-Water Fruit Additions: Adding raw, chopped fruits (like strawberries or peaches) introduces free water, which freezes into hard, icy pebbles. Always cook fresh fruits down into a thick reduction, or use high-sugar jams and fruit curds instead.
-
Chill Mix-ins Before Adding: If adding melted chocolate ribbons, toasted nuts, or homemade caramel, bring them to room temperature or chill them in the fridge first. Warm additions will melt the whipped cream structure upon contact.
-
Mind the Alcohol Content: Adding a tablespoon of liqueur (such as Bourbon, Baileys, Amaretto, or Rum) creates complex flavor notes and keeps the ice cream soft. However, adding more than 2 tablespoons will prevent the base from freezing solid.
-
Dip Your Scoop in Warm Water: When ready to serve, run a metal ice cream scoop under hot running water for 10 seconds and dry it quickly with a towel. The warm metal glides cleanly through the frozen cream to produce round scoops.
Safe Storage & Shelf Life Guidelines
Proper storage prevents freezer burn and keeps the texture smooth for weeks:
-
Storage Temperature: Store your ice cream in the main compartment of your freezer, ideally at or below 0°F (-18°C). Avoid storing it on the freezer door, where frequent opening exposes it to temperature fluctuations.
-
Surface Protection: Keep a layer of plastic cling wrap or wax paper pressed directly onto the exposed surface of the ice cream underneath an airtight container lid. This blocks air and stops crystallization.
-
Shelf Life:
-
Peak Quality: Best enjoyed within the first 2 to 3 weeks for optimal flavor and texture.
-
Safe Consumption: Can remain safely stored in an airtight container for up to 2 months.
-
Frequently Asked Questions (FAQ)
Can I use evaporated milk instead of sweetened condensed milk?
No. Evaporated milk does not contain added sugar and contains significantly more water. Using evaporated milk without modifications results in a hard, icy block rather than smooth, scoopable ice cream.
Is no-churn ice cream overly sweet?
Because sweetened condensed milk contains concentrated sugar, no-churn ice cream is naturally sweet. You can easily balance this profile by adding a pinch of fine sea salt, using unsweetened Dutch cocoa, incorporating tart fruit swirls, or adding a squeeze of fresh lemon zest.
Why is my no-churn ice cream hard to scoop?
If your freezer runs exceptionally cold (below -5°F / -20°C), the ice cream may freeze firmly. Simply let the container sit on the kitchen counter at room temperature for 5 to 8 minutes before scooping.
Can I make a dairy-free or vegan no-churn ice cream?
Yes. Substitute the heavy dairy cream with chilled full-fat canned coconut whipping cream (whipped to stiff peaks) and use canned sweetened condensed coconut milk or sweetened condensed oat milk in an exact 1:1 ratio.
Summary of the Method
Making premium ice cream at home does not require expensive machines or culinary training. By combining the natural aeration of whipped heavy cream with the rich texture of sweetened condensed milk, you can produce bakery-quality frozen treats in minutes. Use this base formula, customize it with your favorite mix-ins, and enjoy fresh homemade scoops straight from your kitchen.