Apple Slab Pie: A Delicious Twist on a Classic Dessert
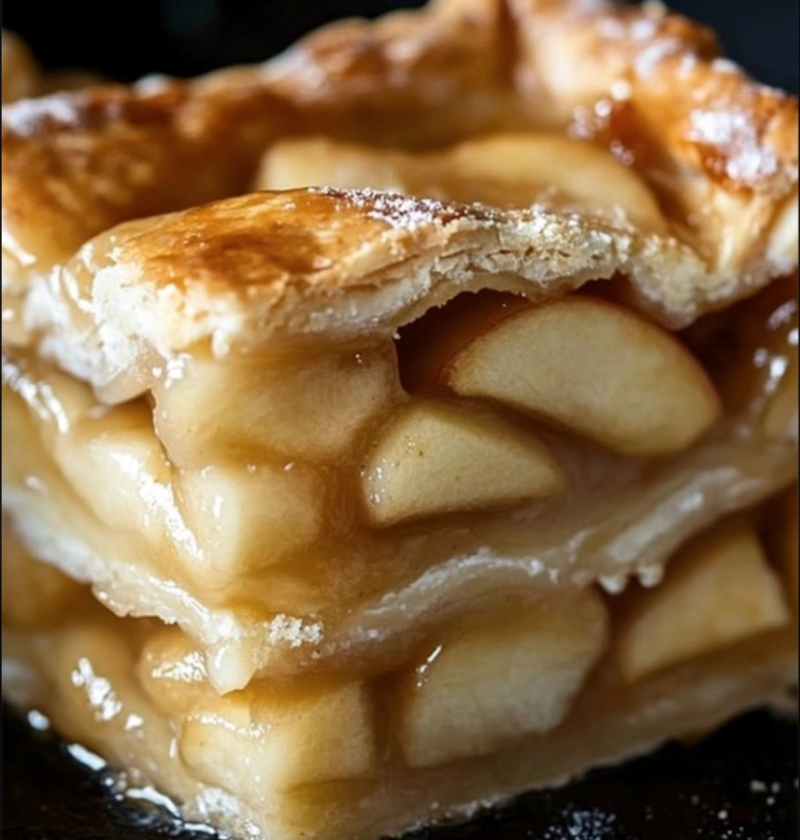
Apple pie is a timeless dessert that brings warmth and comfort to any occasion. But if you’re looking to take your apple pie game to the next level, look no further than apple slab pie. This delightful twist on the classic apple pie is perfect for feeding a crowd or satisfying your sweet tooth all week long. With its flaky crust, juicy apple filling, and irresistible cinnamon aroma, apple slab pie is sure to become a new favorite in your dessert repertoire. In this article, we’ll walk you through the steps to create this delectable treat, along with some variations, tips, and commonly asked questions. So let’s get baking!
Ingredients
For the Crust:
- 3 cups all-purpose flour
- 1 teaspoon salt
- 1 cup unsalted butter, cold and cubed
- 1/2 cup ice water
For the Filling:
- 5-6 large apples, peeled, cored, and thinly sliced
- 1/2 cup granulated sugar
- 1/4 cup all-purpose flour
- 1 teaspoon ground cinnamon
- 1/4 teaspoon ground nutmeg
- 1 tablespoon lemon juice
For the Topping:
- 1/2 cup all-purpose flour
- 1/2 cup packed brown sugar
- 1/2 cup old-fashioned oats
- 1/2 teaspoon ground cinnamon
- 1/4 cup unsalted butter, melted
Steps
Step 1: Prepare the Crust
In a large mixing bowl, whisk together the flour and salt for the crust. Add the cold cubed butter and use a pastry cutter or your fingertips to cut the butter into the flour until the mixture resembles coarse crumbs.
Add the ice water, one tablespoon at a time, and mix until the dough comes together. Divide the dough into two equal parts and shape each into a disk. Wrap them in plastic wrap and refrigerate for at least 30 minutes.
Step 2: Preheat the Oven and Prepare the Filling
Preheat your oven to 375°F (190°C). In a large bowl, combine the sliced apples, granulated sugar, flour, cinnamon, nutmeg, and lemon juice. Toss the mixture gently until the apples are evenly coated. Set aside.
Step 3: Roll Out the Dough
Remove one of the dough disks from the refrigerator and let it sit at room temperature for a few minutes to soften slightly. On a lightly floured surface, roll out the dough into a rectangular shape that will fit your baking sheet. Transfer the rolled-out dough to the baking sheet and press it into the bottom.
Step 4: Add the Apple Filling
Spoon the prepared apple filling onto the rolled-out dough, spreading it evenly. Be sure to leave a small border around the edges to allow for sealing with the top crust.
Step 5: Create the Top Crust
Remove the second dough disk from the refrigerator and roll it out into a rectangular shape that matches the size of the bottom crust. Carefully place the rolled-out dough on top of the apple filling, aligning it with the edges of the bottom crust.
Step 6: Seal and Vent the Pie
Using a fork or your fingers, press the edges of the top and bottom crusts together to seal the pie. Use a sharp knife to make a few small slits on the top crust to allow steam to escape during baking.
Step 7: Prepare the Topping
In a separate bowl, combine the flour, brown sugar, oats, cinnamon, and melted butter for the topping. Mix until the ingredients are well combined and crumbly in texture.
Step 8: Add the Topping and Bake
Sprinkle the topping mixture evenly over the top crust of the pie. Place the apple slab pie in the preheated oven and bake for 45-50 minutes, or until the crust is golden brown and the filling is bubbling.
Step 9: Cool and Serve
Once baked, remove the pie from the oven and let it cool on a wire rack for at least 30 minutes before serving. This will allow the filling to set and make it easier to slice into neat squares. Serve the apple slab pie warm on its own or with a scoop of vanilla ice cream for an extra treat!
Variations
While the classic apple slab pie is undeniably delicious, feel free to experiment with some variations to suit your taste preferences:
1. Mixed Berry Slab Pie:
Combine apples with your favorite berries, such as blueberries, raspberries, or blackberries, for a burst of fruity goodness. Adjust the sugar amount based on the sweetness of the berries.
2. Streusel Topping:
Skip the traditional top crust and instead sprinkle a buttery streusel topping made with flour, brown sugar, oats, and cinnamon over the apple filling. This adds an extra layer of texture and flavor.
3. Caramel Apple Slab Pie:
Drizzle caramel sauce over the apple filling before adding the top crust for a decadent twist. The caramel adds a rich and sweet element that pairs perfectly with the tartness of the apples.
Tips
Follow these tips to ensure your apple slab pie turns out perfectly every time:
1. Use a Variety of Apples:
For the best flavor and texture, use a combination of apple varieties, such as Granny Smith, Honeycrisp, and Golden Delicious. This blend will provide a balance of tartness, sweetness, and firmness.
2. Keep the Dough Cold:
Chilling the dough before rolling it out helps prevent it from becoming too soft and sticky. This makes it easier to handle and results in a flakier crust.
3. Adjust the Sugar:
The amount of sugar needed for the filling may vary depending on the sweetness of the apples and your personal taste preferences. Taste the apple mixture before assembling the pie and adjust the sugar accordingly.
4. Don’t Overfill the Pie:
Be mindful not to overfill the pie with the apple mixture. If there’s too much filling, it may spill over during baking and make the crust soggy.
5. Let it Cool:
Allowing the pie to cool before slicing helps the filling set and makes it easier to cut neat squares. If you cut into the pie while it’s still hot, the filling may be runny and the pie won’t hold its shape.
Conclusion
Apple slab pie is a delightful dessert that takes the classic apple pie to new heights. With its buttery crust, luscious apple filling, and irresistible topping, this dessert is a crowd-pleaser that will leave everyone craving more. Whether you’re hosting a gathering or simply treating yourself, apple slab pie is a must-try recipe that will impress both your taste buds and your guests. So roll up your sleeves, gather your ingredients, and get ready to enjoy a slice of apple heaven!
FAQs
Q: Can I make the crust ahead of time?
A: Yes, you can prepare the crust a day or two in advance. Just make sure to wrap it tightly in plastic wrap and store it in the refrigerator until you’re ready to use it.
Q: Can I freeze apple slab pie?
A: Absolutely! Once the pie has cooled completely, wrap it tightly in plastic wrap and aluminum foil before placing it in the freezer. It will keep well for up to three months. To thaw, simply leave it in the refrigerator overnight and reheat in a preheated oven at 350°F (175°C) for about 15 minutes.
Q: Can I use store-bought pie crust instead?
A: If you’re short on time or prefer the convenience, you can certainly use store-bought pie crust for this recipe. Just make sure to follow the package instructions for rolling and baking.
Q: Can I add nuts to the topping?
A: Absolutely! Chopped nuts, such as walnuts or pecans, can add a delightful crunch to the topping. Simply mix them in with the flour, brown sugar, oats, and cinnamon before adding the melted butter.
Now that you have all the information you need, it’s time to head to the kitchen and start baking your very own apple slab pie. Get ready to enjoy the heavenly aroma and delicious flavors that will make this dessert a new family favorite!
